前言
在学习Spring框架源码时,记住一句话:源码并不难,只需要给你各种业务场景或者项目经理,你也能实现自己的Spring。虽然你的实现可能无法与开源团队相媲美,但是你肯定可以实现一个0.0.1版本。因此,初次阅读源码时,不要陷入太深的细节中。先了解大体逻辑,再仔细研读。
实现功能
本文将带领大家实现一个简易版的Spring框架,并介绍以下功能点:
- 了解Spring的底层源码启动过程
- 了解BeanDefinition的概念
- 了解Spring解析配置类等底层源码工作流程
- 了解依赖注入,Aware回调等底层源码工作流程
- 了解Spring AOP的底层源码工作流程
以上功能点将使我们对Spring框架的实现有所了解,但我们并不会一下子实现整个Spring框架的业务。我们将从上述功能点入手,通过手写模拟Spring框架来实现这些功能。
首先,我们像使用Spring一样,传入配置类获取applicationContext,再通过getBean方法获取具体对象。最后,我们调用方法并打印日志。如果你对这些基本流程不熟悉,可以查看我的入门系列文章:Spring入门系列:浅析知识点
详细流程如下:
- 解析配置类上的ComponentScan注解,获取扫描的基本路径
- 开始解析各个被扫描到的文件,是否是需要被Spring管理,如果是则暂存到list集合中
- 开始遍历被Spring管理list集合,解析各个类上的注解,比如是否是懒加载,然后将这些属性都封装到applicationContext中的以beanName为key的BeanDefineMap中
- 针对已经解析好的bean定义进行创建对象并实例化,并将其放入以beanName为key的singletonMap实例化缓存池中。
- 在实例化时,如果发现有依赖注入的对象,则将实例化缓存池中的对象存入。如果缓存池中没有该对象,则进行创建后再注入。
- 判断对象是否实现了各个Aware接口,如果实现,则进行回调。
- 判断对象是否属于增强类。在这里,我们模拟了事务注解。如果有事务注解,则创建一个代理对象,并为所有方法增加拦截器。然后将该代理对象存入单例缓存池中。
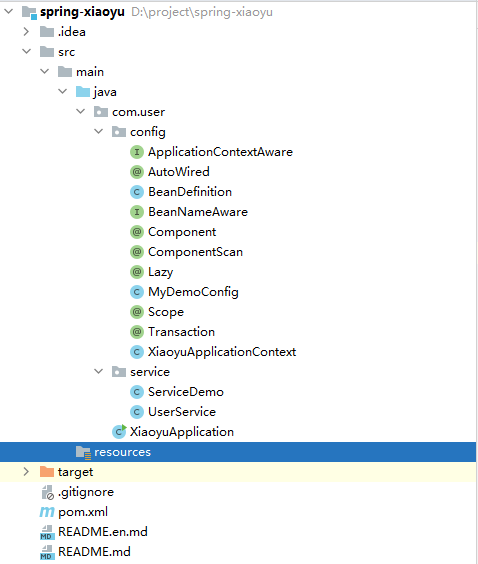
详细解析项目结构
基本路径:com.user目录
各个注解及上下文类:config目录
需要被管理的Bean:service目录
启动类:com.user根目录

源码分析
@Componentpublic class UserService implements ApplicationContextAware, BeanNameAware { @AutoWired ServiceDemo serviceDemo; private XiaoyuApplicationContext applicationContext; private String beanName; public void test() { serviceDemo.say();// System.out.println(serviceDemo); System.out.println("userService:"+applicationContext.getBean("userService")); System.out.println("beanName:"+beanName); } @Override public void setApplicationContext(XiaoyuApplicationContext applicationContext) { this.applicationContext = applicationContext; } @Override public void setBeanName(String beanName) { this.beanName = beanName; }}UserService类主要用于测试是否Spring已经管理了相关对象并生成了代理对象,是我们的日常业务类,我们仔细看下XiaoyuApplicationContext类,主要的流程在这边:
public class XiaoyuApplicationContext { //配置类 private Class config; //初始的bean定义 private Map beanDefineMap = new HashMap(); //单例缓存池 private Map singleBean = new HashMap(); public XiaoyuApplicationContext(Class myDemoConfigClass) { config = myDemoConfigClass; //解析配置类 scan(); } public void scan(){ ComponentScan declaredAnnotation = (ComponentScan) config.getDeclaredAnnotation(ComponentScan.class); String value = declaredAnnotation.basePackages(); doScan(value); //将bean定义Map生成具体的Bean对象 beanDefineMap.entrySet().stream().forEach(item->{ String beanName = item.getKey(); BeanDefinition beanDefinition = item.getValue(); if (!beanDefinition.isLazy() && "singleton".equals(beanDefinition.getScope())) { Object bean = createBean(beanName); singleBean.put(beanName,bean); } }); } /** * 解析配置类 */ private void doScan(String value) { String path = value.replace(".","/"); //正常走文件解析 ClassLoader classLoader = this.getClass().getClassLoader(); URL resource = classLoader.getResource(path); File file = new File(resource.getFile()); List classFile = new ArrayList(); //简单点直接双层解析即可 if (file.isDirectory()) { for (File f : file.listFiles()) { if (f.isDirectory()) { for (File f1 : f.listFiles()) { if (!f1.isDirectory()) { classFile.add(f1); } } } else { classFile.add(f); } } } //遍历所有解析文件 for (File cFile : classFile) { String absolutePath = cFile.getAbsolutePath(); String className = absolutePath.substring(absolutePath.indexOf("com"), absolutePath.indexOf(".class")) .replace("\\", "."); try { Class clazz = classLoader.loadClass(className); //是否需要被Spring管理 if (clazz.isAnnotationPresent(Component.class)) { //将bean上的注解封装到bean定义中 BeanDefinition beanDefinition = new BeanDefinition(); beanDefinition.setType(clazz); beanDefinition.setLazy(clazz.isAnnotationPresent(Lazy.class)); if (clazz.isAnnotationPresent(Scope.class)) { beanDefinition.setScope(clazz.getAnnotation(Scope.class).value()); } else { beanDefinition.setScope("singleton"); } String beanName = clazz.getAnnotation(Component.class).value(); if (beanName.isEmpty()) { //如果不设置beanName会默认生产唯一一个name,Spring底层也是这样做的 beanName = Introspector.decapitalize(clazz.getSimpleName()); } beanDefineMap.put(beanName, beanDefinition); } } catch (ClassNotFoundException e) { e.printStackTrace(); } } } public Object createBean(String beanName){ BeanDefinition beanDefinition = beanDefineMap.get(beanName); Class type = beanDefinition.getType(); try { Object instance = type.newInstance(); //属性填充,依赖注入 populateBean(instance); if (instance instanceof ApplicationContextAware){ ((ApplicationContextAware) instance).setApplicationContext(this); } if (instance instanceof BeanNameAware) { ((BeanNameAware) instance).setBeanName(beanName); } //是否需要AOP增强 if (type.isAnnotationPresent(Transaction.class)) { Enhancer enhancer = new Enhancer(); enhancer.setSuperclass(type); //简单的方法切面 enhancer.setCallback(new MethodInterceptor() { @Override public Object intercept(Object proxy, Method method, Object[] objects, MethodProxy methodProxy) throws Throwable { //开启事务,关闭自动提交 System.out.println("事务已开启"); Object res = method.invoke(instance, objects); //提交事务 System.out.println("事务已提交"); return res; } }); return enhancer.create(); } return instance; } catch (InstantiationException e) { e.printStackTrace(); } catch (IllegalAccessException e) { e.printStackTrace(); } return null; } private void populateBean(Object instance) { Field[] declaredFields = instance.getClass().getDeclaredFields(); Arrays.stream(declaredFields).forEach(item->{ //寻找注入点 if (item.isAnnotationPresent(AutoWired.class)) { Object bean = getBean(item.getName()); item.setAccessible(true); try { item.set(instance,bean); } catch (IllegalAccessException e) { e.printStackTrace(); } } }); } public Object getBean(String beanName){ if (!beanDefineMap.containsKey(beanName)) { throw new NullPointerException(); } if ("singleton".equals(beanDefineMap.get(beanName).getScope())) { if (singleBean.containsKey(beanName)) { return singleBean.get(beanName); } else { Object bean = createBean(beanName); singleBean.put(beanName,bean); return bean; } } return createBean(beanName); }}以上即为整个流程的基本梳理。我们在实现过程中没有涉及Bean循环依赖以及其他各种创建缓存,但Spring在实现Bean的创建过程中确实用到了各种本地缓存和同步锁(synchronized)。在学习源码时,不要太关注这些细节。首先要理解整个流程,再深入研究。
结语
最后,我们在gitee上提供了项目源码。如果需要,可以查看spring-xiaoyu。虽然我认为写一遍自己的代码更好,因为这是最简单的流程,有助于理解Spring源码。
ps:以上内容,纯属个人见解,有任何问题下方评论!关注博主公众号,源码专题、面试精选、AI扩展等你来看!原创编写不易,转载请说明出处!