本篇记录我在实现时的思考过程,写给之后可能遇到困难的我自己也给到需要帮助的人。
写的比较浅显,见谅。
在写项目代码的时候,需要把Android端的位置信息传输到服务器端,通过Netty达到连续传输的效果,如下:
我们可以先来看看百度地图官方给出的相关代码
public class MainActivity extends AppCompatActivity {private MapView mMapView = null;private BaiduMap mBaiduMap = null;private LocationClient mLocationClient = null;private TextView mtextView;// 是否是第一次定位private boolean isFirstLocate = true;// 当前定位模式private MyLocationConfiguration.LocationMode locationMode;@Overrideprotected void onCreate(Bundle savedInstanceState) { super.onCreate(savedInstanceState); LocationClient.setAgreePrivacy(true); SDKInitializer.initialize(getApplicationContext()); setContentView(R.layout.activity_main); mMapView = findViewById(R.id.bmapView); mtextView = findViewById(R.id.text_tishi); //开启交通图 mBaiduMap = mMapView.getMap(); mBaiduMap.setTrafficEnabled(true); //开启地图的定位图层 mBaiduMap.setMyLocationEnabled(true);// BaiduMapOptions options = new BaiduMapOptions();// options.mapType(BaiduMap.MAP_TYPE_SATELLITE);// MapView mapView = new MapView(this, options);// setContentView(mapView);卫星地图view显示 //定位初始化 LocationClient mLocationClient = null; try { mLocationClient = new LocationClient(MainActivity.this); } catch (Exception e) { e.printStackTrace(); }//通过LocationClientOption设置LocationClient相关参数 LocationClientOption option = new LocationClientOption(); option.setOpenGps(true); // 打开gps option.setCoorType("bd09ll"); // 设置坐标类型 option.setScanSpan(1000);// 可选,设置地址信息 option.setIsNeedAddress(true); //可选,设置是否需要地址描述 option.setIsNeedLocationDescribe(true);//设置locationClientOption mLocationClient.setLocOption(option);//注册LocationListener监听器 MyLocationListene myLocationListener = new MyLocationListene(); mLocationClient.registerLocationListener(myLocationListener);//开启地图定位图层 mLocationClient.start();}public class MyLocationListene extends BDAbstractLocationListener { @Override public void onReceiveLocation(BDLocation location) { //mapView 销毁后不在处理新接收的位置 if (location == null || mMapView == null) { return; } LatLng ll = new LatLng(location.getLatitude(), location.getLongitude()); if (isFirstLocate) { isFirstLocate = false; //给地图设置状态 mBaiduMap.animateMapStatus(MapStatusUpdateFactory.newLatLng(ll)); } MyLocationData locData = new MyLocationData.Builder() .accuracy(location.getRadius()) // 此处设置开发者获取到的方向信息,顺时针0-360 .direction(location.getDirection()).latitude(location.getLatitude()) .longitude(location.getLongitude()).build(); mBaiduMap.setMyLocationData(locData); // 更换定位图标,这里的图片是放在 drawble 文件下的 BitmapDescriptor mCurrentMarker = BitmapDescriptorFactory.fromResource(R.drawable.icon_gcoding); // 定位模式 地图SDK支持三种定位模式:NORMAL(普通态), FOLLOWING(跟随态), COMPASS(罗盘态) locationMode = MyLocationConfiguration.LocationMode.NORMAL; // 定位模式、是否开启方向、设置自定义定位图标、精度圈填充颜色以及精度圈边框颜色5个属性(此处只设置了前三个)。 MyLocationConfiguration mLocationConfiguration = new MyLocationConfiguration(locationMode,true,mCurrentMarker);// 使自定义的配置生效 mBaiduMap.setMyLocationConfiguration(mLocationConfiguration); // 显示当前信息 StringBuilder stringBuilder = new StringBuilder(); stringBuilder.append("\n经度:" + location.getLatitude()); stringBuilder.append("\n纬度:"+ location.getLongitude()); stringBuilder.append("\n状态码:"+ location.getLocType()); stringBuilder.append("\n国家:" + location.getCountry()); stringBuilder.append("\n城市:"+ location.getCity()); stringBuilder.append("\n区:" + location.getDistrict()); stringBuilder.append("\n街道:" + location.getStreet()); stringBuilder.append("\n地址:" + location.getAddrStr()); mtextView.setText(stringBuilder.toString()); }}}使用者需要创建一个LocationClient对象,为LocationClient配置Option、注册监听器(BDAbstractLocationListener)来获取位置信息,监听器得到的BDLocation对象中含有需要的位置信息,我们需要把他取出。
在思考阶段,我想直接把Listener中的BDLocation对象直接取出,把BDLocation对象变成String类型通过Netty传输至服务端,过程如下:
但是想法很美好,显示很残酷,BDAbstractLocationListener并不允许我们这么做/(ㄒoㄒ)/~~
我创建了MapUtil类,用于获取位置信息
public class MapUtil {public LocationClient mLocationClient = null;//百度地图服务private MyLocationListener myListener=new MyLocationListener();//创建监听器public BDLocation location;public MapUtil(LocationClient mLocationClient,BDLocation location) this.mLocationClient=mLocationClient;//拿到百度地图api中的服务 this.location=location;//拿到主线程中的netty对话管理器}public void init(){ LocationClientOption option = new LocationClientOption(); option.setOpenGps(true); // 打开gps option.setCoorType("bd09ll"); // 设置坐标类型 option.setScanSpan(1000); // 可选,设置地址信息 option.setIsNeedAddress(true); //可选,V7.2版本新增能力 //如果设置了该接口,首次启动定位时,会先判断当前Wi-Fi是否超出有效期,若超出有效期,会先重新扫描Wi-Fi,然后定位 option.setWifiCacheTimeOut(5*60*1000);// option.setIgnoreKillProcess(true); //可选,设置是否需要地址描述 option.setIsNeedLocationDescribe(true); mLocationClient.setLocOption(option);//注入百度地图定位相关配置 mLocationClient.registerLocationListener(myListener);//注册监听器 mLocationClient.start();//启动服务 mLocationClient.requestLocation();}public void stop(){ mLocationClient.stop();//停止服务}public class MyLocationListener extends BDAbstractLocationListener { MyLocationListener(){ } @Override public void onReceiveLocation(BDLocation location1){ //此处的BDLocation为定位结果信息类,通过它的各种get方法可获取定位相关的全部结果 //以下只列举部分获取经纬度相关(常用)的结果信息 //更多结果信息获取说明,请参照类参考中BDLocation类中的说明loction=loction1; }}}我企图直接在Listener中拿到参数,结果是可以,但可以的不多
数据只能停留在Listener中,无法带出Listener,因为Listener是在持续运行中的,相当于是一个while(true)的死循环,MapUtil中的Location确实可以拿到位置,但数据也卡在了Listener中。
这个错误让我思考了很久。
最后,我意识到,也许在最开始,我思考的方向就不是正确的,或许它的流程应该是这样: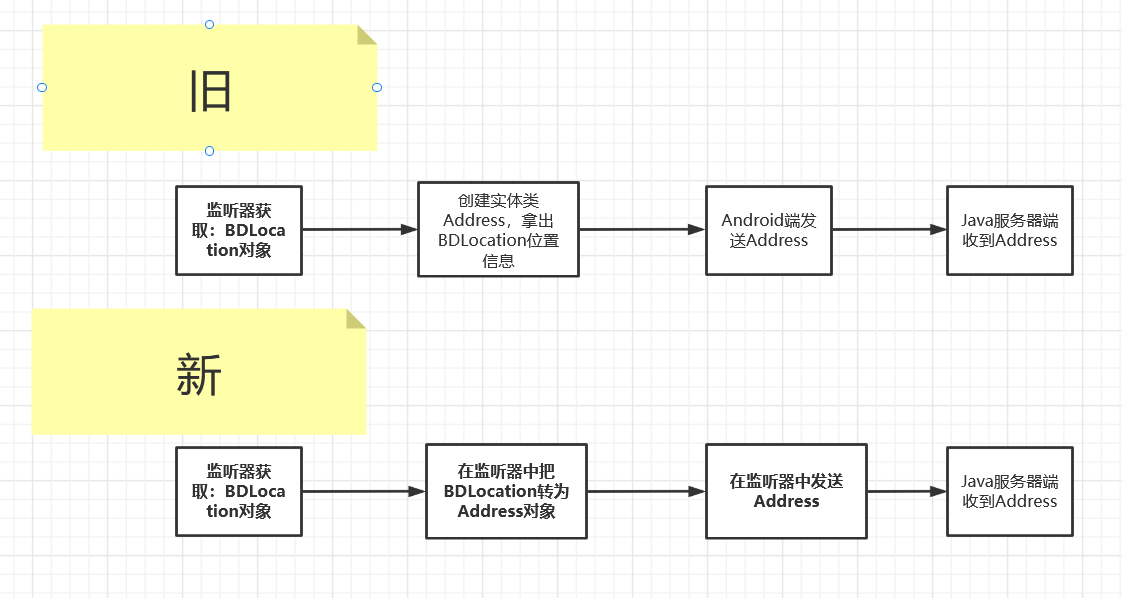
于是我把MapUtil类中的传入的location改为了chatManger
public class MyLocationListener extends BDAbstractLocationListener {
MyLocationListener(){ } @Override public void onReceiveLocation(BDLocation location){ //此处的BDLocation为定位结果信息类,通过它的各种get方法可获取定位相关的全部结果 //以下只列举部分获取经纬度相关(常用)的结果信息 //更多结果信息获取说明,请参照类参考中BDLocation类中的说明 CoderUtil coderUtil=new CoderUtil();//创建CoderUtil类用于处理文字 MyAddress address=coderUtil.transform(location);//将百度地图中的location类通过CoderUtil转换为MyAddress类 chatManager.sendData(address);//使用netty对话管理器发送处理完毕的地址 }}以下为chatManger代码:
public class ChatManager implements ChatListener{
private String TAG = ChatManager.class.getSimpleName();public static volatile ChatManager instance = null;private ChatClient chatClient = null;private Handler handler;public ChatManager(){ chatClient=new ChatClient();}public static ChatManager getInstance(Handler handler) { if (instance == null) { synchronized (ChatManager.class) { if (instance == null) { instance = new ChatManager(); } } } instance.setHandler(handler); return instance;}public void setHandler(Handler handler){ this.handler = handler;}public void sendData(MyAddress address) { System.out.println("ChatManger正在发送数据"); chatClient.sendMsgToServer(address, new ChannelFutureListener() { @Override public void operationComplete(ChannelFuture future) throws Exception { if (future.isSuccess()) { Log.e(TAG, "发送成功"); } else { Log.e(TAG, "发送失败"); } } });}public void connectNetty(IpPortInfo ipPortSetInfo) { new Thread(new Runnable() { @Override public void run() { Log.e(TAG, "客户端启动自动连接..."); if (!chatClient.getConnectStatus()) { chatClient.setListener(ChatManager.this); chatClient.connect(ipPortSetInfo); } else { chatClient.disconnect(); } } }).start();}@Overridepublic void onMessageResponse(ChannelHandlerContext ctx, String msg) {}@Overridepublic void onServiceStatusConnectChanged(int statusCode) {}}总而言之,就是一个记录Netty连接信息的类。
最后终于成功!!!!!!!!!!!!!!!
在遇到怎么想都无法解决的问题是,一定要有破釜沉舟的勇气啊各位,从问题的源头开始找,询问是不是自己一开始的方向就错了!!!