相较于BarCode,QRCode有明显的特征区域,也就是左上角、右上角、左下角三个”回“字区域,得益于hierarchy中,父子关系的轮廓是连续的(下标),所以这个时候我们就可以通过cv2.findContours()返回的hierarchy来进行定位。
我们直接上代码
1 import cv2 2 import numpy 3 4 5 def qrcode(image): 6 # 有些二维码和边缘紧贴,无法识别出整个矩形,所以我们先对图片大小进行扩展 7 expand_length = 10 8 edge = expand_length // 2 9 h, w = image.shape[:2]10 image_extend = numpy.zeros((image.shape[0] + expand_length, image.shape[1] + expand_length, 3), numpy.uint8)11 image_extend[:] = 25512 image_extend[edge:edge + h, edge:edge + w] = image13 14 # 转灰度、二值化、找轮廓15 gray = cv2.cvtColor(image_extend, cv2.COLOR_BGR2GRAY)16 # blur = cv2.GaussianBlur(gray, (5, 5), 0)17 _, thresh = cv2.threshold(gray, 127, 255, cv2.THRESH_BINARY)18 contours, hir = cv2.findContours(thresh, cv2.RETR_TREE, cv2.CHAIN_APPROX_SIMPLE)19 20 '''21 2.428218279875564722 2.320312115409233723 2.348760721352034524 2.31801026730626625 '''26 27 # 三个“回”字特征轮廓存储28 parent_hierarchy_list = []29 parent_contours_list = []30 31 # 通过层级信息去查找三个“回”字特征区域32 for index, item in enumerate(hir[0][:-2]): # 查找最外层(A)轮廓33 if item[2] != -1:34 parent_index = item[2] - 135 if hir[0][index+1][3] == parent_index: # 查找次一层(B)轮廓36 child_first = hir[0][index+1][2] - 137 if hir[0][index+2][3] == child_first: # 查找最里层(C)轮廓38 # 计算A轮廓的周长和C轮廓周长的比值39 error = cv2.arcLength(contours[parent_index], True) / cv2.arcLength(contours[parent_index + 2], True)40 if 2 < error < 3:41 parent_hierarchy_list.append(item)42 parent_contours_list.append(contours[index])43 # 绘制出三个“回”字特征区域的最外层轮廓44 cv2.drawContours(image_extend, contours, index, (0, 255, 0), 3)45 46 # 将整个二维码区域绘制出来47 points_list = []48 for index, box in enumerate(parent_contours_list):49 x, y, w, h = cv2.boundingRect(box)50 if index == 0:51 points_list.append((x, y+h))52 if index == 1:53 points_list.append((x+w, y))54 if index == 2:55 points_list.append((x, y))56 points_list = numpy.array(points_list)57 rect = cv2.minAreaRect(points_list)58 box = cv2.boxPoints(rect)59 box = numpy.int0(box)60 cv2.drawContours(image_extend, [box], 0, (255, 0, 0), 2)61 62 cv2.imshow('', image_extend)63 64 65 if __name__ == '__main__':66 img = cv2.imread('../images/QRCode_3.png')67 qrcode(img)68 cv2.waitKey()69 cv2.destroyAllWindows()
通常我们所见的二维码都是有留白边缘区域的,但是在随便找一些二维码图的过程中,有一些是没有留白边缘区域的:

上图是在IDE中打开的,原图是没有灰色边缘的,这个时候我们如果直接读取这张图片,得到的轮廓信息并不是我们期待的三个连续的父子关系的hierarchy,为了避免这种情况,这里就手动向外扩展十个像素,人为制造一个间隔。
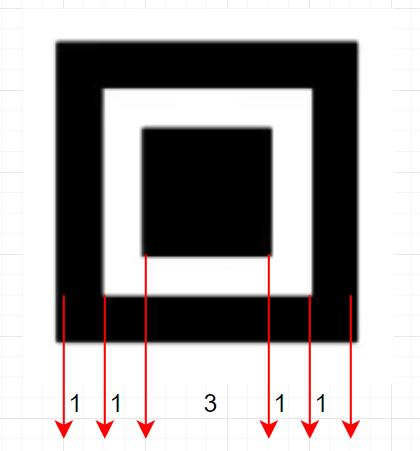
通常来说,我们通过三层for循环来定位特征区域已经是足够的,但是如果二维码的其他区域也出现了三层轮廓,那么我们就需要进行筛选,所以代码通过计算最外层轮廓的长度和最内存轮廓长度的比值来进行筛选,每一个“回”的黑白框框的比例大概为1:1:3:1:1,也就是说他们的边长比为7:3,而这个比值在标准二维码中,只有三个特征区域才符合。
代码的21到24行中的数值,便是尝试过了四个不同的二维码得出的比值,都接近7:3。
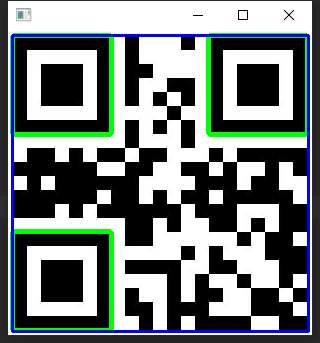
最后我们绘制出四个边框,完成二维码的定位:
参考博客:opencv实现二维码检测_opencv识别二维码-CSDN博客