开始就进入微服务阶段
javase:OOP
MySQL:持久化
html+css+js+jquery+框架:视图,框架不熟练,css不好
javaweb:独立开发MVC三层架构的网站:原始
ssm:框架:简化了我们的开发流程,配置也开始较为复杂;
之前项目打包都是war包,程序在Tomcat中运行
spring再简化:springBoot-jar包,内嵌Tomcat;微服务架构!
服务越来越多:springCloud

1、SpringBoot简介
1.1、回顾什么是Spring
什么是Spring
Spring是一个开源框架,2003 年兴起的一个轻量级的Java 开发框架,作者:Rod Johnson 。
Spring是为了解决企业级应用开发的复杂性而创建的,简化开发。
Spring是如何简化Java开发的
为了降低Java开发的复杂性,Spring采用了以下4种关键策略:
基于POJO的轻量级和最小侵入性编程,所有东西都是bean;
通过IOC,依赖注入(DI)和面向接口实现松耦合;
基于切面(AOP)和惯例进行声明式编程;
通过切面和模版减少样式代码,RedisTemplate,xxxTemplate;
1.2、什么是SpringBoot
学过javaweb的同学就知道,开发一个web应用,从最初开始接触Servlet结合Tomcat, 跑出一个Hello Wolrld程序,是要经历特别多的步骤;后来就用了框架Struts,再后来是SpringMVC,到了现在的SpringBoot,过一两年又会有其他web框架出现;你们有经历过框架不断的演进,然后自己开发项目所有的技术也在不断的变化、改造吗?建议都可以去经历一遍;
所有的技术框架的发展似乎都遵循了一条主线规律:从一个复杂应用场景 衍生 一种规范框架,人们只需要进行各种配置而不需要自己去实现它,这时候强大的配置功能成了优点;发展到一定程度之后,人们根据实际生产应用情况,选取其中实用功能和设计精华,重构出一些轻量级的框架;之后为了提高开发效率,嫌弃原先的各类配置过于麻烦,于是开始提倡“约定大于配置”,进而衍生出一些一站式的解决方案。是的这就是Java企业级应用->J2EE->spring->springboot的过程。
随着 Spring 不断的发展,涉及的领域越来越多,项目整合开发需要配合各种各样的文件,慢慢变得不那么易用简单,违背了最初的理念,甚至人称配置地狱。Spring Boot 正是在这样的一个背景下被抽象出来的开发框架,目的为了让大家更容易的使用 Spring 、更容易的集成各种常用的中间件、开源软件;Spring Boot 基于 Spring 开发,Spirng Boot 本身并不提供 Spring 框架的核心特性以及扩展功能,只是用于快速、敏捷地开发新一代基于 Spring 框架的应用程序。也就是说,它并不是用来替代 Spring 的解决方案,而是和 Spring 框架紧密结合用于提升 Spring 开发者体验的工具。Spring Boot 以约定大于配置的核心思想,默认帮我们进行了很多设置,多数 Spring Boot 应用只需要很少的 Spring 配置。同时它集成了大量常用的第三方库配置(例如 Redis、MongoDB、Jpa、RabbitMQ、Quartz 等等),Spring Boot 应用中这些第三方库几乎可以零配置的开箱即用。 简单来说就是SpringBoot其实不是什么新的框架,它默认配置了很多框架的使用方式,就像maven整合了所有的jar包,spring boot整合了所有的框架 。
Spring Boot 出生名门,从一开始就站在一个比较高的起点,又经过这几年的发展,生态足够完善,Spring Boot 已经当之无愧成为 Java 领域最热门的技术。Spring Boot的主要优点:
- 为所有Spring开发者更快的入门
- 开箱即用,提供各种默认配置来简化项目配置
- 内嵌式容器简化Web项目
- 没有冗余代码生成和XML配置的要求
1.3、微服务架构
微服务是一种架构风格,他要求我们在开发一个应用的时候,这个应用必须建成一系列小服务组合,可以通过http方式进行通信。
所谓微服务加购,就是打破之前all in one的架构方式,把每个功能元素独立出来,把独立出来的功能元素的动态组合,需要的功能元素才去拿来组合,需要多一些可以整合多个功能元素,所以微服务架构是对功能元素进行赋值,而没有对整个应用进行复制,这样做的好处是:- 节省了调用资源
- 每个功能元素的服务都是一个可替换的,可独立升级的软件代码
程序核心:高内聚(在划分模块时,要把功能关系紧密的放到一个模块中)
低耦合(模块之间的联系越少越好,接口越简单越好)
论文地址:https://blog.csdn.net/qq_34831748/article/details/117318860

构建微服务分工:
- 构建一个个功能独立的微服务应用单元,可以使用springboot,可以帮我们快速构建一个应用
- 大型分布式网络服务的调用,这部分springcloud来完成,实现分布式
- 在分布式中间,进行流式数据计算,批处理,我们有spring cloud data flow
- spring为我们想清楚了整个开始构建应用到大型分布式应用全流程方案
2、第一个SpringBoot程序
2.1环境配置
环境准备:
- java version “1.8.0_181”
- Maven-3.6.1
- SpringBoot 2.x 最新版
开发工具:
- IDEA
2.2创建基础项目说明
Spring官方提供了非常方便的工具让我们快速构建应用,IDEA也集成了这个网站
Spring Initializr:https://start.spring.io/
2.2.1项目创建方式一
使用Spring Initializr 的 Web页面创建项目
打开 https://start.spring.io/
填写项目信息
点击”Generate Project“按钮生成项目;下载此项目


解压项目包,并用IDEA以Maven项目导入,一路下一步即可,直到项目导入完毕。
如果是第一次使用,可能速度会比较慢,包比较多、需要耐心等待一切就绪。
2.2.2项目创建方式二
使用 IDEA 直接创建项目
创建一个新项目
选择spring initalizr , 可以看到默认就是去官网的快速构建工具那里实现
填写项目信息

选择初始化的组件(初学勾选 Web 即可)
填写项目路径
等待项目构建成功
2.2.3项目结构分析:
- 程序的主启动类(程序的主入口)HelloController
- 一个 application.properties 配置文件(SpringBoot的核心配置文件)
- 一个 测试类 HelloWorldApplicationTests
- 一个 pom.xml
pom.xml:
<project xmlns="http://maven.apache.org/POM/4.0.0" xmlns:xsi="http://www.w3.org/2001/XMLSchema-instance" xsi:schemaLocation="http://maven.apache.org/POM/4.0.0 https://maven.apache.org/xsd/maven-4.0.0.xsd"> <modelVersion>4.0.0</modelVersion> <parent><groupId>org.springframework.boot</groupId><artifactId>spring-boot-starter-parent</artifactId><version>2.4.0</version><relativePath/> </parent> <groupId>com.hwt</groupId> <artifactId>demo</artifactId> <version>0.0.1-SNAPSHOT</version> <name>HelloWorld</name> <description>Demo project for Spring Boot</description> <properties><java.version>1.8</java.version> </properties> <dependencies><dependency> <groupId>org.springframework.boot</groupId> <artifactId>spring-boot-starter-web</artifactId></dependency><dependency> <groupId>org.springframework.boot</groupId> <artifactId>spring-boot-starter-test</artifactId> <scope>test</scope></dependency> </dependencies> <build><plugins> <plugin><groupId>org.springframework.boot</groupId><artifactId>spring-boot-maven-plugin</artifactId> </plugin></plugins> </build></project>编写一个http接口
在主程序的同级目录下,新建一个controller包,一定要在同级目录下,否则识别不到
在包中新建一个HelloController类
//自动装配@RestControllerpublic class HelloController {//接口:http://localhost:8080/hello@RequestMapping("/hello")public String hello(){//调用业务return "hello,world";}}测试运行通过访问localhost:8080/hello浏览器输出hello,world

2.2.4、项目打jar包
点击maven里的package

在target会得到一个jar包

执行命令:java -jar .\demo-0.0.1-SNAPSHOT.jar

测试在浏览器访问(http://localhost:8080/hello)
彩蛋
更改启动时显示的字符拼成的字母,修改banne图案
到项目下的 resources 目录下新建一个banner.txt 即可。
图案:https://www.bootschool.net/ascii 这个网站生成,然后拷贝到文件中即可!
2.3运行原理初探
2.3.1pom.xml
父依赖
核心依赖在父工程中
这里我们在引入一些SpringBoot依赖的时候,不需要指定版本,就因为有这些版本仓库
其中它主要是依赖一个父项目,主要是管理项目的资源过滤及插件!
<parent><groupId>org.springframework.boot</groupId><artifactId>spring-boot-starter-parent</artifactId><version>2.7.9</version><relativePath/> </parent>点进去会发现还有一个父依赖:
<parent><groupId>org.springframework.boot</groupId><artifactId>spring-boot-dependencies</artifactId><version>2.7.9</version></parent>这里才是真正管理SpringBoot应用里面所有依赖版本的地方,SpringBoot的版本控制中心;
以后我们导入依赖默认是不需要写版本;但是如果导入的包没有在依赖中管理着就需要手动配置版本了;
启动器 spring-boot-starter
<dependency><groupId>org.springframework.boot</groupId><artifactId>spring-boot-starter</artifactId></dependency>- 启动器:就是SpringBoot的启动场景
- 比如spring-boot-starter-web,会帮我们自动导入web环境所有的依赖
- springboot会将所有功能场景,都变成一个个的启动器
- 我们要是用什么功能,就需要找到一个个启动器就可以了
主启动类
//标注这是一个springBoot启动类@SpringBootApplicationpublic class Springboot01HelloworldApplication {public static void main(String[] args) {//通过这个方法将springboot启动SpringApplication.run(Springboot01HelloworldApplication.class, args);}}@SpringBootApplication:springBoot配置
@SpringBootConfiguration //spring配置类@ComponentScan //说明这也是一个spring的组件@EnableAutoConfiguration : 自动配置
@AutoConfigurationPackage //自动配置包@Import({Registrar.class}) //导入了选择器@Import({AutoConfigurationImportSelector.class})//自动配置选择容器protected List<String> getCandidateConfigurations(AnnotationMetadata metadata, AnnotationAttributes attributes)//获取所有配置获取候选的配置
protected List<String> getCandidateConfigurations(AnnotationMetadata metadata, AnnotationAttributes attributes) {List<String> configurations = new ArrayList(SpringFactoriesLoader.loadFactoryNames(this.getSpringFactoriesLoaderFactoryClass(), this.getBeanClassLoader()));ImportCandidates.load(AutoConfiguration.class, this.getBeanClassLoader()).forEach(configurations::add);Assert.notEmpty(configurations, "No auto configuration classes found in META-INF/spring.factories nor in META-INF/spring/org.springframework.boot.autoconfigure.AutoConfiguration.imports. If you are using a custom packaging, make sure that file is correct.");return configurations;}
META-INF/spring.factories:自动配置的核心文件

结构图:

SpringBoot所有的自动配置,都在启动类中被扫描并加载:所有的自动配置类都在这里面,但是不一定生效,要判断条件是否成立,只要导入了对应的starter们就有对应的启动器了,有了启动器,我们的自动装配就会生效,然后就配置成功了
- SpringBoot在启动的时候,从类路径下/META-INF/spring.factories获取指定的值
- 将这些自动配置的类导入容器,自动配置类就会生效,帮我们进行自动配置
- 以前我们需要自动配置的东西,现在不需要了
- 整合javaEE,解决方案和自动配置的东西都在Spring-boot-autoconfigure下
- 它会把所有需要导入的组件,以类名的方式返回这些组件,这些组件就会被添加到容器
- 容器中也会存在非常多的XXXAutoConfigure的文件(@Bean),就是这个类给容器导入了这个场景所需要的所有组件并自动配置
SpringApplication
@SpringBootApplicationpublic class SpringbootApplication {public static void main(String[] args) {SpringApplication.run(SpringbootApplication.class, args);}}SpringApplication.run分析
分析该方法主要分两部分,一部分是SpringApplication的实例化,二是run方法的执行;
SpringApplication这个类主要做了以下四件事情:
1、推断应用的类型是普通的项目还是Web项目
2、查找并加载所有可用初始化器 , 设置到initializers属性中
3、找出所有的应用程序监听器,设置到listeners属性中
4、推断并设置main方法的定义类,找到运行的主类
run方法流程分析:

关于SpringBoot,谈谈你的理解:
- 自动装配:如何加载
- run方法:如何启动
全面接管SpringMVC的配置!
3、yaml语法
3.1 yaml概述
配置文件:
SpringBoot使用一个全局的配置文件 , 配置文件名称是固定的
application.properties
- 语法结构 :key=value
application.yml
- 语法结构 :key:空格 value
**配置文件的作用 :**修改SpringBoot自动配置的默认值,因为SpringBoot在底层都给我们自动配置好了;
比如我们可以在配置文件中修改Tomcat 默认启动的端口号!测试一下!
YAML是 “YAML Ain’t a Markup Language” (YAML不是一种标记语言)的递归缩写。在开发的这种语言时,YAML 的意思其实是:“Yet Another Markup Language”(仍是一种标记语言)
这种语言以数据作为中心,而不是以标记语言为重点!
以前的配置文件,大多数都是使用xml来配置;比如一个简单的端口配置,我们来对比下yaml和xml
传统xml配置:
<server><port>8081<port></server>yaml配置:
server:prot: 8081yaml基础语法:
# k-v键值对# 对空格要求十分高name: gaoqiqiang#相当于name=xiaoqi# 存对象student:name: gaoqiqiangage: 40# 行内写法student1: {name: gaoqiqiang,age: 40}# 对象使用{ } 数组使用 [ ]#数组pets:- cat- dog- pigpets1: [cat,dog,pig]语法要求十分严格!
1、空格不能省略
2、以缩进来控制层级关系,只要是左边对齐的一列数据都是同一个层级的。
3、属性和值的大小写都是十分敏感的。
3.2、yaml语法测试
Person类
@Componentpublic class Person {private String name;private Integer age;private boolean happy;private Date birth;private Map<String,Object> map;private List<Object> list;private Dog dog;}@Componentpublic class Dog {@Value(("旺财"))private String name;@Value("5")private Integer age;}application.yaml
person:name: 高启强age: 5happy: falsebirth: 2023/03/08map: {k1: v1,k2: v2}list:- code- musicdog:name: 旺财age: 3springboot配置注解处理器没有找到
@Component@ConfigurationProperties(prefix = "person")public class Person {private String name;private Integer age;private boolean happy;private Date birth;private Map<String,Object> map;private List<Object> list;private Dog dog;}
导入文件:
<dependency><groupId>org.springframework.boot</groupId><artifactId>spring-boot-configuration-processor</artifactId><optional>true</optional></dependency>测试类中进行测试
@SpringBootTestclass Springboot02ConfigApplicationTests {//@Autowired//private Dog dog;@Autowiredprivate Person person;@Testvoid contextLoads() { // System.out.println(dog);System.out.println(person);}}通过测试或得到了所有yaml数据
3.3、加载指定配置文件
新建一个application.properties文件
name=高启强修改之前的Person类
//指定配置文件@PropertySource(value = "classpath:application1.properties")public class Person {//spel表达式取出配置文件的值@Value("${name}")private String name;private Integer age;private boolean happy;private Date birth;private Map<String,Object> map;private List<Object> list;private Dog dog;}测试后得到name=高启强
配置文件占位符
person:name: 高启强${random.uuid} # 生成随机uuidage: ${random.int}#随机数happy: falsebirth: 2023/03/08map: {k1: v1,k2: v2}list:- code- musicdog:name: ${person.hello:hello}_旺财# 占位符age: 3对比小结:
@Value这个使用起来并不友好!我们需要为每个属性单独注解赋值,比较麻烦;我们来看个功能对比图

@ConfigurationProperties只需要写一次即可 , @Value则需要每个字段都添加
**松散绑定:**这个什么意思呢? 比如我的yaml中写的last-name,这个和lastName是一样的, – 后面跟着的字母默认是大写的。这就是松散绑定。可以测试一下
JSR303数据校验 , 这个就是我们可以在字段是增加一层过滤器验证 , 可以保证数据的合法性
复杂类型封装,yaml中可以封装对象 , 使用value就不支持。
结论
配置yaml和配置properties都可以获取到值 , 但是强烈推荐 yaml;
如果我们在某个业务中,只需要获取配置文件中的某个值,可以使用一下 @value;
如果说,我们专门编写了一个JavaBean来和配置文件进行一一映射,就直接@configurationProperties,不要犹豫!
4、 JSR303数据校验及多环境切换
4.1、 JSR303数据校验
使用:
Springboot中可以用@validated来校验数据,如果数据异常则会统一抛出异常,方便异常中心统一处理。我们这里来写个注解让我们的name只能支持Email格式;
@Component@ConfigurationProperties(prefix = "person")@Validated//数据校验public class Person {@Email(message="邮箱格式错误") //name必须是邮箱格式private String name;运行结果:
Property: person.nameValue: 高启强1390d6b9-6380-4b42-ada6-d1567633fe6dOrigin: class path resource [application.yaml] - 2:9Reason: 邮箱格式错误常见参数:
@NotNull(message="名字不能为空")private String userName;@Max(value=120,message="年龄最大不能查过120")private int age;@Email(message="邮箱格式错误")private String email;空检查@Null 验证对象是否为null@NotNull验证对象是否不为null, 无法查检长度为0的字符串@NotBlank 检查约束字符串是不是Null还有被Trim的长度是否大于0,只对字符串,且会去掉前后空格.@NotEmpty 检查约束元素是否为NULL或者是EMPTY.Booelan检查@AssertTrue 验证 Boolean 对象是否为 true@AssertFalse验证 Boolean 对象是否为 false长度检查@Size(min=, max=) 验证对象(Array,Collection,Map,String)长度是否在给定的范围之内@Length(min=, max=) string is between min and max included.日期检查@Past 验证 Date 和 Calendar 对象是否在当前时间之前@Future 验证 Date 和 Calendar 对象是否在当前时间之后@Pattern验证 String 对象是否符合正则表达式的规则数值检查 建议使用在Stirng,Integer类型,不建议使用在int类型上,因为表单值为“”时无法转换为int,但可以转换为Stirng为”“,Integer为null @Min 验证 Number 和 String 对象是否大等于指定的值 @Max 验证 Number 和 String 对象是否小等于指定的值 @DecimalMax 被标注的值必须不大于约束中指定的最大值. 这个约束的参数是一个通过BigDecimal定义的最大值的字符串表示.小数存在精度 @DecimalMin 被标注的值必须不小于约束中指定的最小值. 这个约束的参数是一个通过BigDecimal定义的最小值的字符串表示.小数存在精度 @Digits 验证 Number 和 String 的构成是否合法 @Digits(integer=,fraction=) 验证字符串是否是符合指定格式的数字,interger指定整数精度,fraction指定小数精度。 @Range(min=, max=) 被指定的元素必须在合适的范围内 @Range(min=10000,max=50000,message=”range.bean.wage”) @Valid 递归的对关联对象进行校验, 如果关联对象是个集合或者数组,那么对其中的元素进行递归校验,如果是一个map,则对其中的值部分进行校验.(是否进行递归验证) @CreditCardNumber信用卡验证 @Email 验证是否是邮件地址,如果为null,不进行验证,算通过验证。 @ScriptAssert(lang= ,script=, alias=) @URL(protocol=,host=, port=,regexp=, flags=)]()]()4.2 、多环境切换
profile是Spring对不同环境提供不同配置功能的支持,可以通过激活不同的环境版本,实现快速切换环境;
多配置文件:
我们在主配置文件编写的时候,文件名可以是 application-{profile}.properties/yml , 用来指定多个环境版本;
例如:
application-test.properties 代表测试环境配置
application-dev.properties 代表开发环境配置
但是Springboot并不会直接启动这些配置文件,它默认使用application.properties主配置文件;
我们需要通过一个配置来选择需要激活的环境:
#比如在配置文件中指定使用dev环境,我们可以通过设置不同的端口号进行测试;
#我们启动SpringBoot,就可以看到已经切换到dev下的配置了;
spring.profiles.active=dev
外部加载配置文件的方式和优先级:
优先级1:项目路径下的config文件夹配置文件
优先级2:项目路径下配置文件
优先级3:资源路径下的config文件夹配置文件
优先级4:资源路径下配置文件

优先级由高到底,高优先级的配置会覆盖低优先级的配置;
#配置项目的访问路径server.servlet.context-path=/kuang多文档块:
和properties配置文件中一样,但是使用yml去实现不需要创建多个配置文件,更加方便了
yaml通过三个-来分割模块
#选择要激活那个环境块spring:profiles:active: devserver:port: 8081---server:port: 8083spring:profiles: dev #配置环境的名称---server:port: 8084spring:profiles: prod#配置环境的名称拓展:
指定位置加载配置文件
我们还可以通过spring.config.location来改变默认的配置文件位置
项目打包好以后,我们可以使用命令行参数的形式,启动项目的时候来指定配置文件的新位置;这种情况,一般是后期运维做的多,相同配置,外部指定的配置文件优先级最高
java -jar spring-boot-config.jar --spring.config.location=F:/application.properties5、自动装配原理
5.1、 自动装配原理详解
我们以**HttpEncodingAutoConfiguration(Http编码自动配置)**为例解释自动配置原理;
//表示这是一个配置类,和以前编写的配置文件一样,也可以给容器中添加组件;@Configuration //启动指定类的ConfigurationProperties功能;//进入这个HttpProperties查看,将配置文件中对应的值和HttpProperties绑定起来;//并把HttpProperties加入到ioc容器中@EnableConfigurationProperties({HttpProperties.class}) //Spring底层@Conditional注解//根据不同的条件判断,如果满足指定的条件,整个配置类里面的配置就会生效;//这里的意思就是判断当前应用是否是web应用,如果是,当前配置类生效@ConditionalOnWebApplication(type = Type.SERVLET)//判断当前项目有没有这个类CharacterEncodingFilter;SpringMVC中进行乱码解决的过滤器;@ConditionalOnClass({CharacterEncodingFilter.class})//判断配置文件中是否存在某个配置:spring.http.encoding.enabled;//如果不存在,判断也是成立的//即使我们配置文件中不配置pring.http.encoding.enabled=true,也是默认生效的;@ConditionalOnProperty(prefix = "spring.http.encoding",value = {"enabled"},matchIfMissing = true)public class HttpEncodingAutoConfiguration {//他已经和SpringBoot的配置文件映射了private final Encoding properties;//只有一个有参构造器的情况下,参数的值就会从容器中拿public HttpEncodingAutoConfiguration(HttpProperties properties) {this.properties = properties.getEncoding();}//给容器中添加一个组件,这个组件的某些值需要从properties中获取@Bean@ConditionalOnMissingBean //判断容器没有这个组件?public CharacterEncodingFilter characterEncodingFilter() {CharacterEncodingFilter filter = new OrderedCharacterEncodingFilter();filter.setEncoding(this.properties.getCharset().name());filter.setForceRequestEncoding(this.properties.shouldForce(org.springframework.boot.autoconfigure.http.HttpProperties.Encoding.Type.REQUEST));filter.setForceResponseEncoding(this.properties.shouldForce(org.springframework.boot.autoconfigure.http.HttpProperties.Encoding.Type.RESPONSE));return filter;}}根据当前不同的条件判断,决定这个配置类是否生效!
- 一但这个配置类生效;这个配置类就会给容器中添加各种组件;
- 这些组件的属性是从对应的properties类中获取的,这些类里面的每一个属性又是和配置文件绑定的;
- 所有在配置文件中能配置的属性都是在xxxxProperties类中封装着;
- 配置文件能配置什么就可以参照某个功能对应的这个属性类
原先需要在bean中手打的属性(property)封装成了一个类,然后通过yaml文件进行自动注入,而我们也可以在application.yaml文件中对这些property进行赋值。
//从配置文件中获取指定的值和bean的属性进行绑定@ConfigurationProperties(prefix = "spring.http") public class HttpProperties {// .....}精髓:
- SpringBoot启动会加载大量的自动配置类
- 我们看我们需要的功能有没有在SpringBoot默认写好的自动配置类当中;
- 我们再来看这个自动配置类中到底配置了哪些组件;(只要我们要用的组件存在在其中,我们就不需要再手动配置了)
- 给容器中自动配置类添加组件的时候,会从properties类中获取某些属性。我们只需要在配置文件中指定这些属性的值即可;
**xxxxAutoConfigurartion:自动配置类;**给容器中添加组件
xxxxProperties:封装配置文件中相关属性;
6、SpringBoot Web开发
之前的项目都是jar包结尾的,没有存放webapp的地方!!!!!!
SpringBoot最大的特点就是自动装配
创建应用,选择模块导入starter,只需要专注于业务代码
springboot到底帮我们配置了什么,我们能不能修改?能修改哪些东西?能不能扩展
xxxAutoConfiguration:向容器中自动配置组件
xxxProperties:自动配置类,装配配置文件中自定义的一些内容
要解决的问题:
导入静态资源html,css,js
首页
写jsp的地方,模板引擎Thymeleaf
装配和扩展SpringMVC
增删改查
拦截器
国际化
6.1、静态资源处理
addResourceHandlers 添加资源处理
@Overridepublic void addResourceHandlers(ResourceHandlerRegistry registry) {if (!this.resourceProperties.isAddMappings()) {// 已禁用默认资源处理logger.debug("Default resource handling disabled");return;}// 缓存控制Duration cachePeriod = this.resourceProperties.getCache().getPeriod();CacheControl cacheControl = this.resourceProperties.getCache().getCachecontrol().toHttpCacheControl();// webjars 配置if (!registry.hasMappingForPattern("/webjars/**")) {customizeResourceHandlerRegistration(registry.addResourceHandler("/webjars/**") .addResourceLocations("classpath:/META-INF/resources/webjars/") .setCachePeriod(getSeconds(cachePeriod)).setCacheControl(cacheControl));}// 静态资源配置String staticPathPattern = this.mvcProperties.getStaticPathPattern();if (!registry.hasMappingForPattern(staticPathPattern)) {customizeResourceHandlerRegistration(registry.addResourceHandler(staticPathPattern) .addResourceLocations(getResourceLocations(this.resourceProperties.getStaticLocations())) .setCachePeriod(getSeconds(cachePeriod)).setCacheControl(cacheControl));}}6.1.1、webjars
Webjars本质就是以jar包的方式引入我们的静态资源 , 我们以前要导入一个静态资源文件,直接导入即可。
使用SpringBoot需要使用Webjars,我们可以去搜索一下:
网站:https://www.webjars.org
要使用jQuery,我们只要要引入jQuery对应版本的pom依赖即可!
<dependency><groupId>org.webjars</groupId><artifactId>jquery</artifactId><version>3.4.1</version></dependency>导入完毕,查看webjars目录结构,并访问Jquery.js文件!

只要是静态资源,SpringBoot就会去对应的路径寻找资源:通过访问网站http://localhost:8080/webjars/jquery/3.4.1/jquery.js

很少使用webjars!!!
6.1.2、静态资源映射规律

- 在springboot,我们可以使用一下方式处理静态数据
- webjars
localhost:8080/webjars/ - public,static,/**,resources
localhost:8080/
- webjars
- 优先级:resources>static(默认)>public
测试:
分别在几个目录下创建名为1.js的文件

访问:http://localhost:8080/1.js
6.1.3、自定义资源路径
也可以自己通过配置文件来指定一下,哪些文件夹是需要我们放静态资源文件的,在application.properties中配置;
spring.resources.static-locations=classpath:/coding/,classpath:/koko/6.1.4、首页处理
Spring Boot在配置的静态内容位置中查找 favicon.ico。如果存在这样的文件,它将自动用作应用程序的favicon。
关闭默认图标
#关闭默认图标spring.mvc.favicon.enabled=false6.2 Thymeleaf
6.2.1、模板引擎介绍
前端交给我们的页面,是html页面。如果是我们以前开发,我们需要把他们转成jsp页面,jsp好处就是当我们查出一些数据转发到JSP页面以后,我们可以用jsp轻松实现数据的显示,及交互等。
jsp支持非常强大的功能,包括能写Java代码,但是呢,我们现在的这种情况,SpringBoot这个项目首先是以jar的方式,不是war,像第二,我们用的还是嵌入式的Tomcat,所以呢,他现在默认是不支持jsp的。
那不支持jsp,如果我们直接用纯静态页面的方式,那给我们开发会带来非常大的麻烦,那怎么办呢?
- SpringBoot推荐你可以来使用模板引擎:
模板引擎,我们其实大家听到很多,其实jsp就是一个模板引擎,还有用的比较多的freemarker,包括SpringBoot给我们推荐的Thymeleaf,模板引擎有非常多,但再多的模板引擎,他们的思想都是一样的,什么样一个思想呢我们来看一下这张图:

模板引擎的作用就是我们来写一个页面模板,比如有些值呢,是动态的,我们写一些表达式。而这些值,从哪来呢,就是我们在后台封装一些数据。然后把这个模板和这个数据交给我们模板引擎,模板引擎按照我们这个数据帮你把这表达式解析、填充到我们指定的位置,然后把这个数据最终生成一个我们想要的内容给我们写出去,这就是我们这个模板引擎,不管是jsp还是其他模板引擎,都是这个思想。只不过呢,就是说不同模板引擎之间,他们可能这个语法有点不一样。其他的我就不介绍了,我主要来介绍一下SpringBoot给我们推荐的Thymeleaf模板引擎,这模板引擎呢,是一个高级语言的模板引擎,他的这个语法更简单。而且呢,功能更强大。
6.2.2、引入Thymeleaf
怎么引入呢,对于springboot来说,什么事情不都是一个start的事情嘛,我们去在项目中引入一下。给大家三个网址:
Thymeleaf 官网:https://www.thymeleaf.org/
Thymeleaf 在Github 的主页:https://github.com/thymeleaf/thymeleaf
Spring官方文档:找到我们对应的版本
https://docs.spring.io/spring-boot/docs/2.2.5.RELEASE/reference/htmlsingle/#using-boot-starter
pom依赖:
<dependency><groupId>org.thymeleaf</groupId><artifactId>thymeleaf-spring5</artifactId></dependency>结论:使用Thymeleaf,只需要导入对应的依赖即可,如果想要访问页面,我们将html放入Templates目录下即可
测试:
在下创建测试用的test网页
导入thymeleaf-spring5jar包
创建controller类
//在templates目录下的所有页面,只能通过controller来跳转//这个需要模板引擎的支持! Thymeleaf@RestControllerpublic class HelloController {@GetMapping("/test")public String hello(){return "test";}}浏览器访问:http://localhost:8080/test
6.2.3、Thymeleaf语法学习
Thymeleaf 官网:https://www.thymeleaf.org/
测试:
修改测试请求,增加数据传输;
//在templates目录下的所有页面,只能通过controller来跳转//这个需要模板引擎的支持! Thymeleaf@Controllerpublic class HelloController {@GetMapping("/t1")public String hello(Model model){model.addAttribute("msg","hello,Thymeleaf");return "test";}}使用thymeleaf,需要在html文件中导入命名空间的约束,方便提示。
我们去编写下前端页面
<!DOCTYPE html><html lang="en" xmlns:th="http://www.thymeleaf.org"><head><meta charset="UTF-8"><title>测试</title></head><body><h1>测试页面</h1><div th:text="${msg}"></div></body></html>访问:(http://localhost:8080/test)

如果没有访问到页面原因在于测试请求中用的是@RestController注解,修改为@Controller即可
- 简单表达式:
- 变量表达式:
${...} - 选择变量表达式:
*{...} - 消息表达式:
#{...} - 链接网址表达式:
@{...} - 片段表达式:
~{...}
- 变量表达式:
- 文字
- 文本文本:,,…
'one text'``'Another one!' - 数字文字: , , , ,…
0``34``3.0``12.3 - 布尔文字: ,
true``false - 空文本:
null - 文字标记: , , ,…
one``sometext``main
- 文本文本:,,…
- 文本操作:
- 字符串串联:
+ - 文字替换:
|The name is ${name}|
- 字符串串联:
- 算术运算:
- 二元运算符: , , , , ,
+``-``*``/``% - 减号(一元运算符):
-
- 二元运算符: , , , , ,
- 布尔运算:
- 二元运算符: ,
and``or - 布尔否定(一元运算符):,
!``not
- 二元运算符: ,
- 比较和平等:
- 比较器: , , , ( , , ,
>``=``<=``gt``lt``ge``le) - 等运算符: , (,
==``!=``eq``ne)
- 比较器: , , , ( , , ,
- 条件运算符:
- 如果-那么:
(if) " /><!DOCTYPE html><html lang="en" xmlns:th="http://www.thymeleaf.org"><head><meta charset="UTF-8"><title>测试</title></head><body><h1>测试页面</h1><div th:text="${msg}"></div><div th:utext="${msg}"></div><hr><h3 th:each="user:${users}" th:text="${user}"></h3></body></html> 控制器
@Controllerpublic class HelloController {@GetMapping("/test")public String hello(Model model){model.addAttribute("msg","hello,Thymeleaf
");model.addAttribute("users", Arrays.asList("aaa","bbb"));return "test";}}测试:http://localhost:8080/test

7、MVC配置原理
7.1、自动配置原理
在进行项目编写前,我们还需要知道一个东西,就是SpringBoot对我们的SpringMVC还做了哪些配置,包括如何扩展,如何定制。
途径一:源码分析,
途径二:官方文档:https://docs.spring.io/spring-boot/docs/2.2.5.RELEASE/reference/htmlsingle/#boot-features-spring-mvc-auto-configuration
Spring MVC Auto-configuration// Spring Boot为Spring MVC提供了自动配置,它可以很好地与大多数应用程序一起工作。Spring Boot provides auto-configuration for Spring MVC that works well with most applications.// 自动配置在Spring默认设置的基础上添加了以下功能:The auto-configuration adds the following features on top of Spring’s defaults:// 包含视图解析器Inclusion of ContentNegotiatingViewResolver and BeanNameViewResolver beans.// 支持静态资源文件夹的路径,以及webjarsSupport for serving static resources, including support for WebJars // 自动注册了Converter:// 转换器,这就是我们网页提交数据到后台自动封装成为对象的东西,比如把"1"字符串自动转换为int类型// Formatter:【格式化器,比如页面给我们了一个2019-8-10,它会给我们自动格式化为Date对象】Automatic registration of Converter, GenericConverter, and Formatter beans.// HttpMessageConverters// SpringMVC用来转换Http请求和响应的的,比如我们要把一个User对象转换为JSON字符串,可以去看官网文档解释;Support for HttpMessageConverters (covered later in this document).// 定义错误代码生成规则的Automatic registration of MessageCodesResolver (covered later in this document).// 首页定制Static index.html support.// 图标定制Custom Favicon support (covered later in this document).// 初始化数据绑定器:帮我们把请求数据绑定到JavaBean中!Automatic use of a ConfigurableWebBindingInitializer bean (covered later in this document)./*如果您希望保留Spring Boot MVC功能,并且希望添加其他MVC配置(拦截器、格式化程序、视图控制器和其他功能),则可以添加自己的@configuration类,类型为webmvcconfiguer,但不添加@EnableWebMvc。如果希望提供RequestMappingHandlerMapping、RequestMappingHandlerAdapter或ExceptionHandlerExceptionResolver的自定义实例,则可以声明WebMVCregistrationAdapter实例来提供此类组件。*/If you want to keep Spring Boot MVC features and you want to add additional MVC configuration (interceptors, formatters, view controllers, and other features), you can add your own @Configuration class of type WebMvcConfigurer but without @EnableWebMvc. If you wish to provide custom instances of RequestMappingHandlerMapping, RequestMappingHandlerAdapter, or ExceptionHandlerExceptionResolver, you can declare a WebMvcRegistrationsAdapter instance to provide such components.// 如果您想完全控制Spring MVC,可以添加自己的@Configuration,并用@EnableWebMvc进行注释。If you want to take complete control of Spring MVC, you can add your own @Configuration annotated with @EnableWebMvc.我们来仔细对照,看一下它怎么实现的,它告诉我们SpringBoot已经帮我们自动配置好了SpringMVC,然后自动配置了哪些东西呢?
ContentNegotiatingViewResolver 内容协商视图解析器
8、员工管理系统
静态资源链接:https://pan.baidu.com/s/1JJqRWQA3Jcdzk7BfhXhTqw
提取码:vysx
8.1、首页实现
在每个静态页面添加头文件
<html lang="en" xmlns:th="http://www.thymeleaf.org">把所有的路径都修改为thymeleaf
<link th:href="@{asserts/css/bootstrap.min.css}" rel="stylesheet">8.2、国际化
编写i18n国际化资源文件
其中新建三个配置文件,用来配置语言:
login.properties:无语言配置时候生效login_en_US.properties:英文生效login_zh_CN.properties:中文生效
命名方式是下划线的组合:文件名
_语言_国家.properties;login.properties
login.tip=请登录
login.password=密码
login.remember=记住我
login.btn=登录
login.username=用户名login_en_US.properties
login.tip=Please sign in
login.password=password
login.remember=remember me
login.btn=login
login.username=usernamelogin_zh_CN.properties
login.tip=请登录
login.password=密码
login.remember=记住我
login.btn=登录
login.username=用户名
配置国际化资源文件名称
在Spring程序中,国际化主要是通过
ResourceBundleMessageSource这个类来实现的Spring Boot通过
MessageSourceAutoConfiguration为我们自动配置好了管理国际化资源文件的组件实现LocaleResolver接口
public class MyLocaleResolver implements LocaleResolver {//解析请求@Overridepublic Locale resolveLocale(HttpServletRequest request) {//获取请求中的国际化参数String language = request.getParameter("l");//默认的地区Locale locale = Locale.getDefault();//如果请求的链接参数不为空,携带了国际化参数if (!StringUtils.isEmpty(language)) {String[] split = language.split("_");//zh_CN(语言_地区)locale = new Locale(split[0], split[1]);}return locale;}@Overridepublic void setLocale(HttpServletRequest request, HttpServletResponse response, Locale locale) {}}编写bean
@Configuration//@EnableWebMvcpublic class MyMvcConfig implements WebMvcConfigurer {//视图跳转@Overridepublic void addViewControllers(ViewControllerRegistry registry) {registry.addViewController("/").setViewName("index");registry.addViewController("/index.html").setViewName("index");registry.addViewController("/main.html").setViewName("dashboard");}@Beanpublic LocaleResolver localeResolver(){return new MyLocaleResolver();}}前端页面添加中英文切换标签
<a class="btn btn-sm" th:href="@{/index.html(l='zh_CN')}">中文</a><a class="btn btn-sm" th:href="@{/index.html(l='en_US')}">English</a>
8.3、登录功能的实现
前端页面编写一个提交地址并且添加name属性为后端传参
<form class="form-signin" th:action="@{/user/login}"><img class="mb-4" th:src="@{/asserts/img/bootstrap-solid.svg}" alt="" width="72" height="72"><h1 class="h3 mb-3 font-weight-normal" th:text="#{login.tip}">Please sign in</h1><p style="color: red" th:text="${msg}" th:if="${not #strings.isEmpty(msg)}"></p><input type="text" name="username" class="form-control" th:placeholder="#{login.username}" required="" autofocus=""><input type="password" name="password" class="form-control" th:placeholder="#{login.password}" required=""><div class="checkbox mb-3"><label><input type="checkbox" value="remember-me" > [[#{login.remember}]]</label></div><button class="btn btn-lg btn-primary btn-block" type="submit" >[[#{login.btn}]]</button><p class="mt-5 mb-3 text-muted">© 2017-2018</p><a class="btn btn-sm" th:href="@{/index.html(l='zh_CN')}">中文</a><a class="btn btn-sm" th:href="@{/index.html(l='en_US')}">English</a></form>后端接收参数并且控制视图跳转
@Controllerpublic class LoginController {@RequestMapping("/user/login")//@ResponseBodypublic String login(@RequestParam("username") String username , @RequestParam("password") String password, Model model){if (!StringUtils.isEmpty(username)&&"123456".equals(password)){return "redirect:/main.html";}else {model.addAttribute("msg","用户名或者密码错误");return "index";}}}mvc控制器添加视图跳转
registry.addViewController("/main.html").setViewName("dashboard");前端接收msg参数并且展示
8.4、拦截器
为了解决上述遗留的问题,我们需要自定义一个拦截器;
在
config目录下,新建一个登录拦截器类LoginHandlerInterceptor用户登录成功后,后台会得到用户信息;如果没有登录,则不会有任何的用户信息;
我们就可以利用这一点通过拦截器进行拦截:
- 当用户登录时将用户信息存入session中,访问页面时首先判断session中有没有用户的信息
- 如果没有,拦截器进行拦截;
- 如果有,拦截器放行
首先需要将用户登录后的信息存入session
@Controllerpublic class LoginController {@RequestMapping("/user/login")//@ResponseBodypublic String login(@RequestParam("username") String username , @RequestParam("password") String password, Model model, HttpSession session){if (!StringUtils.isEmpty(username)&&"123456".equals(password)){session.setAttribute("loginUser",username);return "redirect:/main.html";}else {model.addAttribute("msg","用户名或者密码错误");return "index";}}}自定义一个拦截器实现LoginHandlerInterceptor接口
public class LoginHandlerInterceptor implements HandlerInterceptor {@Overridepublic boolean preHandle(HttpServletRequest request, HttpServletResponse response, Object handler) throws Exception {//用户登录成功后,应该有自己的sessionObject session = request.getSession().getAttribute("loginUser");if (session == null) {request.setAttribute("msg", "权限不够,请先登录");request.getRequestDispatcher("/index.html").forward(request, response);return false;} else {return true;}}}然后配置到bean中注册,在
MyMvcConfig配置类中,重写关于拦截器的方法,添加我们自定义的拦截器,注意屏蔽静态资源及主页以及相关请求的拦截@Overridepublic void addInterceptors(InterceptorRegistry registry) {registry.addInterceptor(new LoginHandlerInterceptor()).addPathPatterns("/**").excludePathPatterns("/index.html", "/", "/user/login", "/asserts/**");}重启主程序进行测试,直接访问http://localhost:8080/main.html
8.5、查询员工信息
实现视图跳转:
给
dashboard.html页面中Customers部分标签添加href属性,实现点击该标签请求/emps路径跳转到list.html展示所有的员工信息<li class="nav-item"><a class="nav-link" th:href="@{/emps}">//使用th标签获取<svg xmlns="http://www.w3.org/2000/svg" width="24" height="24" viewBox="0 0 24 24" fill="none" stroke="currentColor" stroke-width="2" stroke-linecap="round" stroke-linejoin="round" class="feather feather-users"><path d="M17 21v-2a4 4 0 0 0-4-4H5a4 4 0 0 0-4 4v2"></path><circle cx="9" cy="7" r="4"></circle><path d="M23 21v-2a4 4 0 0 0-3-3.87"></path><path d="M16 3.13a4 4 0 0 1 0 7.75"></path></svg>员工管理</a></li>编写请求对应的controller,处理
/emps请求,在controller包下,新建一个EmployeeController类@Controllerpublic class LoginController {@RequestMapping("/user/login")//@ResponseBodypublic String login(@RequestParam("username") String username , @RequestParam("password") String password, Model model, HttpSession session){if (!StringUtils.isEmpty(username)&&"123456".equals(password)){session.setAttribute("loginUser",username);return "redirect:/main.html";}else {model.addAttribute("msg","用户名或者密码错误");return "index";}}}重启主程序进行测试,登录到dashboard页面,再点击员工管理,成功跳转到 /emps
提取页面公共部分:
在
templates目录下新建一个commons包,其中新建commons.html用来放置公共页面代码,并且删除dashboard.html和list.html中顶部导航栏和侧边栏的代码在dashboard.html和list.html中插入顶部导航栏和侧边栏的代码
<div th:replace="~{commons/commons::topbar}"></div><div class="container-fluid"> <div class="row"><div th:replace="~{commons/commons::sidebar}"></div>测试
添加点击高亮:
在
dashboard.html的侧边栏标签传递参数active为dashboard.html同样在
list.html的侧边栏标签传递参数active为list.html<div th:replace="~{commons/commons::sidebar(active='main.html')}"></div>然后我们在公共页面
commons.html相应标签部分利用thymeleaf接收参数active,利用三元运算符判断决定是否高亮<a th:class="${active=='main.html'" />'nav-link active':'nav-link'}" th:href="@{/index.html}"><a th:class="${active=='list.html'?'nav-link active':'nav-link'}" th:href="@{/emps}">测试
显示员工信息:
修改
list.html页面,显示后端的数据值<table class="table table-striped table-sm"> <thead><tr> <th>id</th> <th>lastName</th> <th>email</th> <th>gender</th> <th>department</th> <th>birth</th> <th>操作</th></tr> </thead> <tbody><tr th:each="emp:${emps}"> <td th:text="${emp.getId()}"></td> <td th:text="${emp.getLastName()}"></td> <td th:text="${emp.getEmail()}"></td> <td th:text="${emp.getGender()}=='0'?'女':'男'"></td> <td th:text="${emp.getDepartment.getDepartmentName()}"></td> <td th:text="${#dates.format(emp.getBirth(),'yyyy-MM-dd HH:mm:ss')}"></td> <td><button class="btn btn-sm btn-primary">编辑</button><button class="btn btn-sm btn-danger">删除</button> </td></tr> </tbody></table>编写list方法
@Controllerpublic class EmployeeController {@AutowiredEmployeeDao employeeDao;@RequestMapping("/emps")public String list(Model model){Collection<Employee> employees = employeeDao.getAll();model.addAttribute("emps",employees);return "emp/list";}}测试
添加员工:
在
add.html页面,当我们填写完信息,点击添加按钮,应该完成添加返回到list页面,展示新的员工信息;因此在add.html点击添加按钮的一瞬间,我们同样发起一个请求/add,与上述提交按钮发出的请求路径一样,但这里发出的是post请求<form th:action="@{/emp}" method="post"><div class="form-group"><label>LastName</label><input type="text" name="lastName" class="form-control" placeholder="lastname:zsr"></div><div class="form-group"><label>Email</label><input type="email" name="email" class="form-control" placeholder="email:xxxxx@qq.com"></div><div class="form-group"><label>Gender</label><br/><div class="form-check form-check-inline"><input class="form-check-input" type="radio" name="gender" value="1"><label class="form-check-label">男</label></div><div class="form-check form-check-inline"><input class="form-check-input" type="radio" name="gender" value="0"><label class="form-check-label">女</label></div></div><div class="form-group"><label>department</label><select class="form-control" name="department.id"><option th:each="department:${departments}" th:text="${department.getDepartmentName()}"th:value="${department.getId()}"></option></select></div><div class="form-group"><label>Birth</label><input type="text" name="birth" class="form-control" placeholder="birth:yyyy/MM/dd"></div><button type="submit" class="btn btn-primary">添加</button></form>编写对应的controller,同样在
EmployeeController中添加一个方法addEmp用来处理点击添加按钮的操作@GetMapping("/toAdd")public String toAddpage(Model model){//获得有部门信息Collection<Department> departments = departmentDao.getDepartment();model.addAttribute("departments",departments);return "emp/add";}@PostMapping("/emp")public String addEmp(Employee employee){//添加System.out.println(employee.toString());employeeDao.save(employee);return "redirect:/emps";}测试,进入添加页面,填写相关信息,注意日期格式默认为
yyyy/MM/dd
8.6、修改员工信息
list页面增加修改请求
<a class="btn btn-sm btn-primary" th:href="@{/emp/}+${emp.getId()}">编辑</a>编写toUpdateEmprestful风格接收参数接收参数并且返回数据信息
//去到员工的修改页面@GetMapping("/emp/{id}")public String toUpdateEmp(@PathVariable("id") Integer id,Model model){//查出原来的数据Employee employee = employeeDao.getEmployeeById(id);model.addAttribute("emp",employee);//获得有部门信息Collection<Department> departments = departmentDao.getDepartment();model.addAttribute("departments",departments);return "emp/update";}复制add页面修改为update页面
<form ><input type="hidden" name="id" th:value="${emp.getId()}"><div class="form-group"><label>LastName</label><input th:value="${emp.getLastName()}" type="text" name="lastName" class="form-control" placeholder="海绵宝宝"></div><div class="form-group"><label>Email</label><input th:value="${emp.getEmail()}" type="email" name="email" class="form-control" placeholder="1176244270@qq.com"></div><div class="form-group"><label>Gender</label><br><div class="form-check form-check-inline"><input th:checked="${emp.getGender()==1}" class="form-check-input" type="radio" name="gender" value="1"><label class="form-check-label">男</label></div></div><div class="form-check form-check-inline"><input th:checked="${emp.getGender()==0}" class="form-check-input" type="radio" name="gender" value="0"><label class="form-check-label">女</label></div><div class="form-group"><label>department</label><select class="form-control" name="department.id"><option th:selected="${dept.getId()==emp.getDepartment().getId()}" th:each="dept:${departments}"th:text="${dept.getDepartmentName()}" th:value="${dept.getId()}"></option></select></div><div class="form-group"><label>Birth</label><input th:value="${#dates.format(emp.getBirth(),'yyyy-MM-dd HH:mm:ss')}" type="text" name="birth" class="form-control" placeholder="2020-07-25 00:00:00"></div><button type="submit" class="btn btn-primary">修改</button></form>edit页面编辑完成提交请求
<form th:action="@{/updateEmp}" method="post">使用后端修改数据并且返回list页面
@PostMapping("/updateEmp")public String updateEmp(Employee employee){employeeDao.save(employee);return "redirect:/emps";}测试
8.7、删除员工信息
修改boton标签为a标签
<a class="btn btn-sm btn-danger" th:href="@{/delemp/}+${emp.getId()}">删除</a>编写对应的controller
//删除员工@GetMapping("/delemp/{id}")public String delemp(@PathVariable("id")Integer id){employeeDao.delete(id);return "redirect:/emps";}测试
404页面
只需要在
templates目录下新建一个error包,然后将404.html放入其中,报错SpringBoot就会自动找到这个页面注销
在提取出来的公共
commons页面,顶部导航栏处中的标签添加href属性,实现点击发起请求/user/logout<ul class="navbar-nav px-3"><li class="nav-item text-nowrap"><a class="nav-link" th:href="@{/user/logout}">注销</a></li></ul>编写对应的controller,处理点击
注销标签的请求,在LoginController中编写对应的方法,清除session,并重定向到首页//注销@RequestMapping("/user/logout")public String logout(HttpSession session){session.invalidate();return "redirect:/index.html";}测试
9、整合JDBC
9.1、SpringData简介
对于数据访问层,无论是 SQL(关系型数据库) 还是 NOSQL(非关系型数据库),Spring Boot 底层都是采用 Spring Data 的方式进行统一处理。
Spring Boot 底层都是采用 Spring Data 的方式进行统一处理各种数据库,Spring Data 也是 Spring 中与 Spring Boot、Spring Cloud 等齐名的知名项目。
Sping Data 官网:https://spring.io/projects/spring-data
数据库相关的启动器 :可以参考官方文档:
https://docs.spring.io/spring-boot/docs/2.2.5.RELEASE/reference/htmlsingle/#using-boot-starter
9.2整合JDBC
数据库表:
CREATE DATABASE /*!32312 IF NOT EXISTS*/`mybatis` /*!40100 DEFAULTCHARACTER SET utf8 */;USE `mybatis`;CREATE TABLE `user`(`id` INT(20) NOT NULL,`name` VARCHAR(30) DEFAULT NULL,`pwd` VARCHAR(30) DEFAULT NULL,PRIMARY KEY(`id`))ENGINE=INNODB DEFAULT CHARSET=utf8;INSERT INTO `user`(`id`,`name`,`pwd`) VALUES(1,'狂神','123456'),(2,'张三','abcdef'),(3,'李四','987654');写配置JDBC文件,application.xml:
spring:datasource:username: rootpassword: rooturl: jdbc:mysql://localhost:3306/mybatis?useSSL=true&userUniceode=true&characterEncoding=utf8driver-class-name: com.mysql.jdbc.DriverJDBCTemplate
有了数据源(com.zaxxer.hikari.HikariDataSource),然后可以拿到数据库连接(java.sql.Connection),有了连接,就可以使用原生的 JDBC 语句来操作数据库;
即使不使用第三方第数据库操作框架,如 MyBatis等,Spring 本身也对原生的JDBC 做了轻量级的封装,即JdbcTemplate。
数据库操作的所有 CRUD 方法都在 JdbcTemplate 中。
Spring Boot 不仅提供了默认的数据源,同时默认已经配置好了 JdbcTemplate 放在了容器中,程序员只需自己注入即可使用
JdbcTemplate 的自动配置是依赖 org.springframework.boot.autoconfigure.jdbc 包下的 JdbcTemplateConfiguration 类
JdbcTemplate主要提供以下几类方法:
execute方法:可以用于执行任何SQL语句,一般用于执行DDL语句;
update方法及batchUpdate方法:update方法用于执行新增、修改、删除等语句;batchUpdate方法用于执行批处理相关语句;
query方法及queryForXXX方法:用于执行查询相关语句;
call方法:用于执行存储过程、函数相关语句。测试:
@SpringBootTestclass Springboot04DataApplicationTests {//注入数据@AutowiredDataSource dataSource;@Testvoid contextLoads() throws SQLException {//查看默认数据源System.out.println(dataSource.getClass());//获得数据连接Connection connection = dataSource.getConnection();System.out.println(dataSource);//xxx Template : SpringBoot已经配置好了模板Bean, 拿来即用 crud//关闭connection.close();}}**测试CRUD : **
@RestControllerpublic class JDBCController {@AutowiredJdbcTemplate jdbcTemplate;//查询数据库的所有信息//没有实体类,数据库中的东西如何获取@GetMapping("/userList")public List<Map<String,Object>> userList(){System.out.println("11");String sql = "select * from user";List<Map<String,Object>> List_map= jdbcTemplate.queryForList(sql); //查询System.out.println(List_map.toString());return List_map;}//添加@GetMapping("/addUser")public String addUser(){String sql = "insert into user(id,name,pwd) values(6,'高启强','1234567')" ;jdbcTemplate.update(sql);return "updateOK";}//修改@GetMapping("/update/{id}")public String update(@PathVariable("id") int id){String sql = "updateuser set name = ?,pwd = ? where id ="+id;//封装Object[] object = new Object[2];object[0] = "高起盛";object[1] = "666";jdbcTemplate.update(sql,object);return "updateOK";}//删除@GetMapping("/del/{id}")public String del(@PathVariable("id") int id){String sql = "delete from user where id = ?" ;jdbcTemplate.update(sql,id);return "updateOK";}}10、集成Druid
10.1、Druid简介
Java程序很大一部分要操作数据库,为了提高性能操作数据库的时候,又不得不使用数据库连接池。
Druid 是阿里巴巴开源平台上一个数据库连接池实现,结合了 C3P0、DBCP 等 DB 池的优点,同时加入了日志监控。
Druid 可以很好的监控 DB 池连接和 SQL 的执行情况,天生就是针对监控而生的 DB 连接池。
Druid已经在阿里巴巴部署了超过600个应用,经过一年多生产环境大规模部署的严苛考验。
Spring Boot 2.0 以上默认使用 Hikari 数据源,可以说 Hikari 与 Driud 都是当前 Java Web 上最优秀的数据源,我们来重点介绍 Spring Boot 如何集成 Druid 数据源,如何实现数据库监控。
Github地址:https://github.com/alibaba/druid/
com.alibaba.druid.pool.DruidDataSource 基本配置参数如下:
参数详解:
DruidDataSource的使用、配置https://mp.weixin.qq.com/s/wVAGOP1JdXZi5DMEsX1Aug
配置属性详解:配置 缺省值 说明 name 配置这个属性的意义在于,如果存在多个数据源,监控的时候可以通过名字来区分开来。如果没有配置,将会生成一个名字,格式是:“DataSource-” + System.identityHashCode(this).另外配置此属性至少在1.0.5版本中是不起作用的,强行设置name会出错 url 连接数据库的url,不同数据库不一样。例如:
mysql : jdbc:mysql://10.20.153.104:3306/druid2
oracle : jdbc:oracle:thin:@10.20.149.85:1521:ocnautousername 连接数据库的用户名 password 连接数据库的密码。如果你不希望密码直接写在配置文件中,可以使用ConfigFilter。详细看这里:https://github.com/alibaba/druid/wiki/%E4%BD%BF%E7%94%A8ConfigFilter driverClassName 根据url自动识别 这一项可配可不配,如果不配置druid会根据url自动识别dbType,然后选择相应的driverClassName nitialSize 0 初始化时建立物理连接的个数。初始化发生在显示调用init方法,或者第一次getConnection时 maxActive 8 最大连接池数量 maxIdle 8 已经不再使用,配置了也没效果 minIdle 最小连接池数量 maxWait 获取连接时最大等待时间,单位毫秒。配置了maxWait之后,缺省启用公平锁,并发效率会有所下降,如果需要可以通过配置useUnfairLock属性为true使用非公平锁。 poolPreparedStatements false 是否缓存preparedStatement,也就是PSCache。PSCache对支持游标的数据库性能提升巨大,比如说oracle。在mysql下建议关闭。 maxOpenPreparedStatements -1 要启用PSCache,必须配置大于0,当大于0时,poolPreparedStatements自动触发修改为true。在Druid中,不会存在Oracle下PSCache占用内存过多的问题,可以把这个数值配置大一些,比如说100 validationQuery 用来检测连接是否有效的sql,要求是一个查询语句。如果validationQuery为null,testOnBorrow、testOnReturn、testWhileIdle都不会其作用。 validationQueryTimeout 单位:秒,检测连接是否有效的超时时间。底层调用jdbc Statement对象的void setQueryTimeout(int seconds)方法 testOnBorrow false 申请连接时执行validationQuery检测连接是否有效,做了这个配置会降低性能。 testWhileIdle false 建议配置为true,不影响性能,并且保证安全性。申请连接的时候检测,如果空闲时间大于timeBetweenEvictionRunsMillis,执行validationQuery检测连接是否有效。 timeBetweenEvictionRunsMillis 1分钟(1.0.14) 有两个含义:1) Destroy线程会检测连接的间隔时间,如果连接空闲时间大于等于minEvictableIdleTimeMillis则关闭物理连接 2) testWhileIdle的判断依据,详细看testWhileIdle属性的说明 numTestsPerEvictionRun 不再使用,一个DruidDataSource只支持一个EvictionRun minEvictableIdleTimeMillis 30分钟(1.0.14) 连接保持空闲而不被驱逐的最长时间 connectionInitSqls 物理连接初始化的时候执行的sql exceptionSorter 根据dbType自动识别 当数据库抛出一些不可恢复的异常时,抛弃连接 filters 属性类型是字符串,通过别名的方式配置扩展插件,常用的插件有: 监控统计用的filter:stat 日志用的filter:log4j 防御sql注入的filter:wall proxyFilters 类型是List,如果同时配置了filters和proxyFilters,是组合关系,并非替换关系 10.2、配置数据源
添加上 Druid 数据源依赖。
<dependency><groupId>com.alibaba</groupId><artifactId>druid</artifactId><version>1.1.10</version></dependency>去配置Druid,配置自定义的数据源
spring:datasource:username: rootpassword: rooturl: jdbc:mysql://localhost:3306/mybatis?useSSL=true&userUniceode=true&characterEncoding=utf8driver-class-name: com.mysql.cj.jdbc.Drivertype: com.alibaba.druid.pool.DruidDataSource设置数据源连接初始化大小、最大连接数、等待时间、最小连接数 等设置项;可以查看源码
#Spring Boot 默认是不注入这些属性值的,需要自己绑定#druid 数据源专有配置initialSize: 5minIdle: 5maxActive: 20maxWait: 60000timeBetweenEvictionRunsMillis: 60000minEvictableIdleTimeMillis: 300000validationQuery: SELECT 1 FROM DUALtestWhileIdle: truetestOnBorrow: falsetestOnReturn: falsepoolPreparedStatements: true#配置监控统计拦截的filters,stat:监控统计、log4j:日志记录、wall:防御sql注入#如果允许时报错java.lang.ClassNotFoundException: org.apache.log4j.Priority#则导入 log4j 依赖即可,Maven 地址:https://mvnrepository.com/artifact/log4j/log4jfilters: stat,wall,log4jmaxPoolPreparedStatementPerConnectionSize: 20useGlobalDataSourceStat: trueconnectionProperties: druid.stat.mergeSql=true;druid.stat.slowSqlMillis=500Druid中包含log4j所以需要导入依赖
<dependency><groupId>log4j</groupId><artifactId>log4j</artifactId><version>1.2.17</version></dependency>为 DruidDataSource 绑定全局配置文件中的参数,再添加到容器中,而不再使用 Spring Boot 的自动生成了;我们需要 自己添加 DruidDataSource 组件到容器中,并绑定属性
@Configurationpublic class DruidConfig {@ConfigurationProperties(prefix = "spring.datasource")@Beanpublic DataSource druidDataSource() {return new DruidDataSource();}}没有注解会404报错
Druid具有看监控功能,可以方便用户在web端看见后台的操作,配置后台监控和过滤器
@Configurationpublic class DruidConfig {@ConfigurationProperties(prefix = "spring.datasource")@Beanpublic DataSource druidDataSource() {return new DruidDataSource();}//后台监控// 配置 Druid 监控管理后台的Servlet;// 内置 Servlet 容器时没有web.xml文件,所以使用 Spring Boot 的注册 Servlet 方式@Beanpublic ServletRegistrationBean statViewServlet() {ServletRegistrationBean bean = new ServletRegistrationBean(new StatViewServlet(), "/druid/*");// 这些参数可以在 com.alibaba.druid.support.http.StatViewServlet// 的父类 com.alibaba.druid.support.http.ResourceServlet 中找到Map<String, String> initParams = new HashMap<>();initParams.put("loginUsername", "admin"); //后台管理界面的登录账号initParams.put("loginPassword", "111111"); //后台管理界面的登录密码// 后台允许谁可以访问// initParams.put("allow", "localhost"):表示只有本机可以访问// initParams.put("allow", ""):为空或者为null时,表示允许所有访问initParams.put("allow", "");// deny:Druid 后台拒绝谁访问// initParams.put("kuangshen", "192.168.1.20");表示禁止此ip访问// 设置初始化参数bean.setInitParameters(initParams);return bean;}//过滤器@Beanpublic FilterRegistrationBean webStatFilter(){FilterRegistrationBean bean = new FilterRegistrationBean();bean.setFilter(new WebStatFilter());//可以过滤的请求HashMap<String, String> initParameters = new HashMap<>();initParameters.put("exclusions","*.js,*.css,/druid/*");//这些东西不进行统计bean.setInitParameters(initParameters);return bean;}}测试:(http://localhost:8080/druid/login.html)
11、整合Mybatis
官方文档:http://mybatis.org/spring-boot-starter/mybatis-spring-boot-autoconfigure/
Maven仓库地址:Maven Repository: org.mybatis.spring.boot » mybatis-spring-boot-starter » 2.1.3 (mvnrepository.com)
导入依赖
<dependency><groupId>org.mybatis.spring.boot</groupId><artifactId>mybatis-spring-boot-starter</artifactId><version>2.1.1</version></dependency>配置数据库连接信息(不变)
spring.datasource.username=rootspring.datasource.password=rootspring.datasource.url=jdbc:mysql://localhost:3306/mybatis?userUnicode=true&useSSL=true&characterEncoding=utf8spring.datasource.driver-class-name=com.mysql.cj.jdbc.Driver测试数据库是否连接成功!
@SpringBootTestclass Springboot05MybatisApplicationTests {@AutowiredDataSource dataSource;@Testvoid contextLoads() throws SQLException {System.out.println(dataSource);System.out.println(dataSource.getConnection());}}创建实体类,导入 Lombok!
@Data@AllArgsConstructor@NoArgsConstructorpublic class User {private int id;private String name;private String pwd;}创建mapper目录以及对应的 Mapper 接口
<!DOCTYPE mapperPUBLIC "-//mybatis.org//DTD Mapper 3.0//EN""http://mybatis.org/dtd/mybatis-3-mapper.dtd"><mapper namespace="com.hwt.springboot05mybatis.mapper.UserMapper"><select id="queryUserList" resultType="User">select * from user</select><select id="queryUserById"parameterType="int"resultType="User">select * from user where id = #{id}</select><update id="update" parameterType="User" >update user set name=#{name},pwd=#{pwd} where id = #{id}</update><insert id="addUser" parameterType="User">insert into user(id,name,pwd) values (#{id},#{name},#{pwd})</insert><delete id="delete" parameterType="int">delete from user where id = #{id}</delete></mapper>.整合mybatis,让spring可以识别mappper
#整合mybatismybatis.type-aliases-package=com.hwt.springboot05mybatis.pojomybatis.mapper-locations=classpath:mybatis/mapper/*.xml
编写controller测试
@RestControllerpublic class UserController {@Autowiredprivate UserMapper userMapper;@GetMapping("/query")public List<User> queryUserList(){List<User> userList = userMapper.queryUserList();for (User user : userList) {System.out.println(user);}return userList;}@GetMapping("/byid/{id}")public User queryUserById(@PathVariable("id") int id){User user = userMapper.queryUserById(id);System.out.println(user);return user;}@GetMapping("/updata")public String updateUser(){User user = new User(4,"高启强","6616");if (userMapper.update(user)!=0){return "ok";}return "false";}@GetMapping("/del/{id}")public String delete(@PathVariable("id") int id){userMapper.delete(id);return "ok";}@GetMapping("/add")public String add(){User user = new User(4,"高启强","666");if (userMapper.addUser(user)!=0){return "ok";}return "false";}}测试
12、SpringSecurity(安全)
一个安全的框架,其实通过过滤器和拦截器也可以实现
官网介绍:Spring Security[官网地址](Spring Security)
shiro、SpringSecurity:很像,除了类不一样
12.1、简介
Spring Security是一个功能强大且高度可定制的身份验证和访问控制框架。它实际上是保护基于spring的应用程序的标准。
Spring Security是一个框架,侧重于为Java应用程序提供身份验证和授权。与所有Spring项目一样,Spring安全性的真正强大之处在于它可以轻松地扩展以满足定制需求
在用户认证方面,Spring Security 框架支持主流的认证方式,包括 HTTP 基本认证、HTTP 表单验证、HTTP 摘要认证、OpenID 和 LDAP 等。在用户授权方面,Spring Security 提供了基于角色的访问控制和访问控制列表(Access Control List,ACL),可以对应用中的领域对象进行细粒度的控制。
SpringBoot中的SpringSecurity依赖:
<dependency><groupId>org.springframework.boot</groupId><artifactId>spring-boot-starter-security</artifactId></dependency>记住几个类 :
- WebSecurityConfigurerAdapter:自定义Security策略
- AuthenticationManagerBuilder:自定义认证策略
- @EnableWebSecurity:开启WebSecurity模式 @Enable开启某个模式
两个单词:en是认证,or是权限
- 认证方式:Authentication
权限:Authorization
12.2、配置页面的访问权限
配置Controller层测试是否都能访问
@Controllerpublic class RouterController {@RequestMapping({"/","/index"})public String index(){return "index";}@RequestMapping("/toLogin")public String toLogin(){return "views/login";}//可以实现公用@RequestMapping("/level1/{id}")public String level(@PathVariable("id") int id){return "views/level1/" +id;}@RequestMapping("/level2/{id}")public String level2(@PathVariable("id") int id){return "views/level2/" +id;}@RequestMapping("/level3/{id}")public String level3(@PathVariable("id") int id){return "views/level3/" +id;}}配置SecurityConfigure,
@EnableWebSecuritypublic class SecurityConfig extends WebSecurityConfigurerAdapter {@Overrideprotected void configure(HttpSecurity http) throws Exception {//首页所有人可以访问,功能页只有对应权限的人才能访问http.authorizeRequests().antMatchers("/").permitAll().antMatchers("/level1/**").hasRole("vip1").antMatchers("/level2/**").hasRole("vip2").antMatchers("/level3/**").hasRole("vip3");}}测试发现除了首页之外别的页面全部都报错:
403权限不足
添加认证和授权
//认证,springboot 2.1x可以直接使用//密码编码:PasswordEncoder()//在spring Secutiry 5.0+之后增加了很多加密方法@Overrideprotected void configure(AuthenticationManagerBuilder auth) throws Exception {auth.inMemoryAuthentication().passwordEncoder(new BCryptPasswordEncoder()).withUser("root").password(new BCryptPasswordEncoder().encode("root")).roles("vip1","vip2","vip3").and().withUser("admin").password(new BCryptPasswordEncoder().encode("root")).roles("vip2","vip3").and().withUser("user").password(new BCryptPasswordEncoder().encode("root")).roles("vip1");}测试
12.3、权限控制和注销
开启自动配置的注销的功能
@EnableWebSecuritypublic class SecurityConfig extends WebSecurityConfigurerAdapter {//授权@Overrideprotected void configure(HttpSecurity http) throws Exception {//首页所有人可以访问,功能页只有对应权限的人才能访问http.authorizeRequests().antMatchers("/").permitAll().antMatchers("/level1/**").hasRole("vip1").antMatchers("/level2/**").hasRole("vip2").antMatchers("/level3/**").hasRole("vip3");//没有访问权限默认会到登录页面http.formLogin();http.logout();//注销,开启了注销功能}在前端,增加一个注销的按钮,index.html 导航栏中
<a class="item" th:href="@{/logout}"><i class="sign-out icon"></i> 注销</a>测试一下,登录成功后点击注销,发现注销完毕会跳转到登录页面!
添加语句注销成功后,让他依旧可以跳转到首页
http.logout().logoutSuccessUrl("/");//注销,开启了注销功能测试,注销完毕后,发现跳转到首页OK
增加新的需求:用户没有登录的时候,导航栏上只显示登录按钮,用户登录之后,导航栏可以显示登录的用户信息及注销按钮!还有就是,比如kuangshen这个用户,它只有 vip2,vip3功能,那么登录则只显示这两个功能,而vip1的功能菜单不显示!这个就是真实的网站情况了!该如何做呢?
我们需要结合thymeleaf中的一些功能
sec:authorize=“isAuthenticated()”:是否认证登录!来显示不同的页面
导入thymeleaf和security结合的Maven依赖:
<dependency> <groupId>org.thymeleaf.extras</groupId> <artifactId>thymeleaf-extras-springsecurity5</artifactId> <version>3.0.4.RELEASE</version></dependency>修改前端页面
导入命名空间
<html lang="en" xmlns="http://www.w3.org/1999/xhtml" xmlns:th="http://www.thymeleaf.org"xmlns:sec="http://www.thymeleaf.org/extras/spring-security">修改导航栏增加认证判断
<div class="right menu"> <div sec:authorize="!isAuthenticated()"> <a class="item" th:href="@{/login}"> <i class="address card icon"></i> 登录 </a> </div> <div sec:authorize="isAuthenticated()"> <a class="item"> <i class="address card icon"></i>用户名:<span sec:authentication="principal.username"></span>角色:<span sec:authentication="principal.authorities"></span> </a> </div> <div sec:authorize="isAuthenticated()"> <a class="item" th:href="@{/logout}"> <i class="address card icon"></i> 注销 </a> </div></div>重启测试发现注销出现404
注销404了,就是因为它默认防止csrf跨站请求伪造,因为会产生安全问题,我们可以将请求 改为post表单提交,或者在spring security中关闭csrf功能;我们试试:在 配置中增 加
http.csrf().disable();http.csrf().disable();//关闭csrf功能:跨站请求伪造,默认只能通过post方式提交logout请求测试:
12.4、记住我及首页定制
记住我:
开启记住我功能
http.rememberMe();//开启记住我功能我们再次启动项目测试一下,发现登录页多了一个记住我功能,我们登录之后关闭 浏览器,然后重新打开浏览器访问,发现用户依旧存在!
浏览器的cookie

并且可以知道这个cookie的保存日期默认为14天
击注销的时候,可以发现,spring security 帮我们自动删除了这个 cookie
**结论:**登录成功后,将cookie发送给浏览器保存,以后登录带上这个cookie,只要通过检查就可以免登录了。如果点击注销,则会删除这个cookie
具体的原理我们在JavaWeb
首页定制:
登录页配置后面指定 loginpage
//没有访问权限默认会到登录页面http.formLogin().loginPage("/toLogin");然后前端也需要指向我们自己定义的 login请求
<div sec:authorize="isAuthenticated()"><a class="item" th:href="@{/logout}">用户名:<span sec:authentication="name"></span>角色:<span sec:authentication="principal.authorities"></span></a></div>我们登录,需要将这些信息发送到哪里,我们也需要配置,login.html 配置提交请求及方式,方式必须为post:
修改访问的页面和接受数据
http.formLogin().loginPage("/toLogin").usernameParameter("user").passwordParameter("pwd").loginProcessingUrl("/login");- 添加前端登录页面记住我
<div class="field"><input type="checkbox" name="remember"> 记住我</div>- hou端接收数据
http.rememberMe().rememberMeParameter("remember");//开启记住我功能13、Shiro
13.1概述
简介
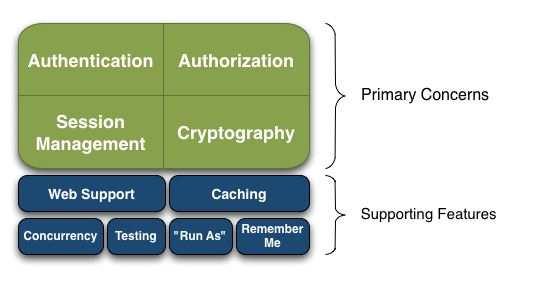
Apache Shiro是一个强大且易用的Java安全框架可以完成身份验证、授权、密码和会话管理
Shiro 不仅可以用在 JavaSE 环境中,也可以用在 JavaEE 环境中
官网: http://shiro.apache.org/
功能
Authentication:身份认证/登录,验证用户是不是拥有相应的身份;
Authorization:授权,即权限验证,验证某个已认证的用户是否拥有某个权限;即判断用户是否能做事情,常见的如:验证某个用户是否拥有某个角色。或者细粒度的验证某个用户对某个资源是否具有某个权限;
Session Manager:会话管理,即用户登录后就是一次会话,在没有退出之前,它的所有信息都在会话中;会话可以是普通JavaSE环境的,也可以是如Web环境的;
Cryptography:加密,保护数据的安全性,如密码加密存储到数据库,而不是明文存储;
Web Support:Web支持,可以非常容易的集成到Web环境;
Caching:缓存,比如用户登录后,其用户信息、拥有的角色/权限不必每次去查,这样可以提高效率;
Concurrency:shiro支持多线程应用的并发验证,即如在一个线程中开启另一个线程,能把权限自动传播过去;
Testing:提供测试支持;
Run As:允许一个用户假装为另一个用户(如果他们允许)的身份进行访问;
Remember Me:记住我,这个是非常常见的功能,即一次登录后,下次再来的话不用登录了。
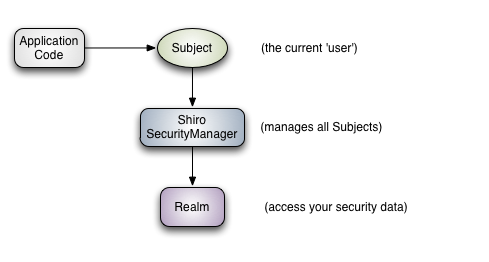
从外部看
应用代码直接交互的对象是Subject,也就是说Shiro的对外API核心就是Subject;其每个API的含义:
Subject:主体,代表了当前“用户”,这个用户不一定是一个具体的人,与当前应用交互的任何东西都是Subject,如网络爬虫,机器人等;即一个抽象概念;所有Subject都绑定到SecurityManager,与Subject的所有交互都会委托给SecurityManager;可以把Subject认为是一个门面;SecurityManager才是实际的执行者;
SecurityManager:安全管理器;即所有与安全有关的操作都会与SecurityManager交互;且它管理着所有Subject;可以看出它是Shiro的核心,它负责与后边介绍的其他组件进行交互,如果学习过SpringMVC,你可以把它看成DispatcherServlet前端控制器;
**Realm:**域,Shiro从从Realm获取安全数据(如用户、角色、权限),就是说SecurityManager要验证用户身份,那么它需要从Realm获取相应的用户进行比较以确定用户身份是否合法;也需要从Realm得到用户相应的角色/权限进行验证用户是否能进行操作;可以把Realm看成DataSource,即安全数据源。
也就是说对于我们而言,最简单的一个Shiro应用:
应用代码通过Subject来进行认证和授权,而Subject又委托给SecurityManager;
我们需要给Shiro的SecurityManager注入Realm,从而让SecurityManager能得到合法的用户及其权限进行判断。
从以上也可以看出,Shiro不提供维护用户/权限,而是通过Realm让开发人员自己注入
内部:
- Subject:任何可以与应用交互的“用户”;
- SecurityManager:相当于SpringMVC中的DispatcherServlet;是Shiro的心脏;所有具体的交互都通过SecurityManager进行控制;它管理着所有Subject、且负责进行认证、授权、会话及缓存的管理。
- Authenticator:负责Subject 认证,是一个扩展点,可以自定义实现;可以使用认证策略(Authentication Strategy),即什么情况下算用户认证通过了;
- Authorizer:授权器、即访问控制器,用来决定主体是否有权限进行相应的操作;即控制着用户能访问应用中的哪些功能;
- Realm:可以有1 个或多个Realm,可以认为是安全实体数据源,即用于获取安全实体的;可以是JDBC 实现,也可以是内存实现等等;由用户提供;所以一般在应用中都需要实现自己的Realm;
- SessionManager:管理Session 生命周期的组件;而Shiro并不仅仅可以用在Web 环境,也可以用在如普通的JavaSE环境
- CacheManager:缓存控制器,来管理如用户、角色、权限等的缓存的;因为这些数据基本上很少改变,放到缓存中后可以提高访问的性能
- Cryptography:密码模块,Shiro提高了一些常见的加密组件用于如密码加密/解密。
认证流程: 用户 提交 身份信息、凭证信息 封装成 令牌 交由 安全管理器 认证
13.2、快速入手
新建一个 Maven 工程,删除其 src 目录,将其作为父工程
在父工程中新建一个 Maven 模块
复制快速入门案例 POM.xml 文件中的依赖 (版本号自选)
<dependencies><dependency><groupId>org.apache.shiro</groupId><artifactId>shiro-core</artifactId><version>1.5.3</version></dependency><dependency><groupId>org.slf4j</groupId><artifactId>jcl-over-slf4j</artifactId><version>1.7.26</version></dependency><dependency><groupId>org.slf4j</groupId><artifactId>slf4j-log4j12</artifactId><version>1.7.26</version></dependency><dependency><groupId>log4j</groupId><artifactId>log4j</artifactId><version>1.2.17</version></dependency></dependencies>把快速入门案例中的 resource 下的
log4j.properties复制下来log4j.rootLogger=INFO, stdoutlog4j.appender.stdout=org.apache.log4j.ConsoleAppenderlog4j.appender.stdout.layout=org.apache.log4j.PatternLayoutlog4j.appender.stdout.layout.ConversionPattern=%d %p [%c] - %m %n# General Apache librarieslog4j.logger.org.apache=WARN# Springlog4j.logger.org.springframework=WARN# Default Shiro logginglog4j.logger.org.apache.shiro=INFO# Disable verbose logginglog4j.logger.org.apache.shiro.util.ThreadContext=WARNlog4j.logger.org.apache.shiro.cache.ehcache.EhCache=WARN复制一下
shiro.ini文件[users]# user 'root' with password 'secret' and the 'admin' roleroot = secret, admin# user 'guest' with the password 'guest' and the 'guest' roleguest = guest, guest# user 'presidentskroob' with password '12345' ("That's the same combination on# my luggage!!!" ;)), and role 'president'presidentskroob = 12345, president# user 'darkhelmet' with password 'ludicrousspeed' and roles 'darklord' and 'schwartz'darkhelmet = ludicrousspeed, darklord, schwartz# user 'lonestarr' with password 'vespa' and roles 'goodguy' and 'schwartz'lonestarr = vespa, goodguy, schwartz# -----------------------------------------------------------------------------# Roles with assigned permissions## Each line conforms to the format defined in the# org.apache.shiro.realm.text.TextConfigurationRealm#setRoleDefinitions JavaDoc# -----------------------------------------------------------------------------[roles]# 'admin' role has all permissions, indicated by the wildcard '*'admin = *# The 'schwartz' role can do anything (*) with any lightsaber:schwartz = lightsaber:*# The 'goodguy' role is allowed to 'drive' (action) the winnebago (type) with# license plate 'eagle5' (instance specific id)goodguy = winnebago:drive:eagle5下载ini插件,如果在setting中无法下载,就去官网下载对应版本的然后导入
导入quickstart.java
执行一下main方法:
2023-03-12 01:23:44,155 INFO [org.apache.shiro.session.mgt.AbstractValidatingSessionManager] - Enabling session validation scheduler... 2023-03-12 01:23:44,755 INFO [Quickstart] - Retrieved the correct value! [aValue] 2023-03-12 01:23:44,756 INFO [Quickstart] - User [lonestarr] logged in successfully. 2023-03-12 01:23:44,756 INFO [Quickstart] - May the Schwartz be with you! 2023-03-12 01:23:44,757 INFO [Quickstart] - You may use a lightsaber ring.Use it wisely. 2023-03-12 01:23:44,757 INFO [Quickstart] - You are permitted to 'drive' the winnebago with license plate (id) 'eagle5'.Here are the keys - have fun!
13.4、SpringBoot整合Shiro环境搭建
测试环境搭建:
新建一个项目或模块
导入依赖
<dependency><groupId>org.thymeleaf</groupId><artifactId>thymeleaf-spring5</artifactId></dependency><dependency><groupId>org.thymeleaf.extras</groupId><artifactId>thymeleaf-extras-java8time</artifactId></dependency><dependency><groupId>org.springframework.boot</groupId><artifactId>spring-boot-starter-web</artifactId></dependency><dependency><groupId>org.springframework.boot</groupId><artifactId>spring-boot-starter-test</artifactId><scope>test</scope></dependency>新建一个controller类测试运行环境
@Controllerpublic class MyController {@RequestMapping({"/index","/"})public String toIndex(Model model){model.addAttribute("msg","hello,shiro");return "index";}@RequestMapping("/user/add")public String add(){return "user/add";}@RequestMapping("/user/update")public String update(){return "user/update";}}分别在config包下新建
UserRealm和ShiroConfig两个类//自定义UserRealm extends AuthorizingRealmpublic class UserRealm extends AuthorizingRealm {//授权@Overrideprotected AuthorizationInfo doGetAuthorizationInfo(PrincipalCollection principalCollection) {System.out.println("执行了=>授权doGetAuthorizationInfo");return null;}//认证@Overrideprotected AuthenticationInfo doGetAuthenticationInfo(AuthenticationToken authenticationToken) throws AuthenticationException {System.out.println("执行力=>认证doGetAuthenticationInfo");return null;}}@Configurationpublic class ShiroConfig {//ShiroFilterFactoryBean@Beanpublic ShiroFilterFactoryBean getShiroFilterFactoryBean(@Qualifier("securityManager")DefaultWebSecurityManager defaultWebSecurityManager){ShiroFilterFactoryBean bean = new ShiroFilterFactoryBean();//设置安全管理器bean.setSecurityManager(defaultWebSecurityManager);return bean;}//DefaultWebSecurityManager@Bean(name="securityManager")public DefaultWebSecurityManager getDefaultWebSecurityManager(@Qualifier("userRealm") UserRealm userRealm){DefaultWebSecurityManager securityManager = new DefaultWebSecurityManager();//关联UserRealmsecurityManager.setRealm(userRealm);return securityManager;}//创建realm对象 ,需要自定义@Beanpublic UserRealm userRealm(){return new UserRealm();}}在templates包下新建user包并且新建add.html和update.html
<!DOCTYPE html><html lang="en"><head><meta charset="UTF-8"><title>Title</title></head><body><h1>add</h1></body></html><!DOCTYPE html><html lang="en"><head><meta charset="UTF-8"><title>Title</title></head><body><h1>update</h1></body></html>并且在index.html中添加跳转超链接
<!DOCTYPE html><html lang="en" xmlns:th="http://www.thymeleaf.org"xmlns:shiro="http://www.thymeleaf.org/thymeleaf-extras-shiro"><head><meta charset="UTF-8"><title>Title</title></head><body><h1>首页</h1><p th:text="${msg}"></p><a th:href="@{/user/add}">add</a> |<a th:href="@{/user/update}">update</a></body></html>测试
13.5、Shiro实现登录拦截
编写登录页面login.html
<!DOCTYPE html><html lang="en"><head><meta charset="UTF-8"><title>登录</title></head><body><h1>登录</h1><hr><form action=""><p>用户名:<input type="text" name="username"></p><p>密码:<input type="text" name="password"></p><p><input type="submit"></p></form></body></html>在controller中添加路径跳转
@RequestMapping("/toLogin")public String toLogin(){return "login";}在
ShiroConfig中的getShiroFilterFactoryBean方法中添加如下配置//设置没有权限进入登录页面bean.setLoginUrl("/toLogin");测试点击update跳转到了login页面
13.6、Shiro实现用户认证
实现用户认证需要去realm类的认证方法中去配置
这里我们先把用户名和密码写死,实际中是要去数据库中去取的
在
MyController中编写用户提交表单之后处理@RequestMapping("/login")public String login(String username ,String password,Model model){//获取当前用户Subject subject = SecurityUtils.getSubject();//封装用户的登录数据UsernamePasswordToken token = new UsernamePasswordToken(username, password);try {subject.login(token);//执行登录方法,没有异常就登录成功了return "index";} catch (UnknownAccountException e) { //用户名不存在model.addAttribute("msg","用户名错误");return "login";} catch (IncorrectCredentialsException e) { //密码错误model.addAttribute("msg","密码错误");return "login";}}ogin.html的修改
<body><h1>登录</h1><hr><p th:text="${msg}" style="color: red"></p><form th:action="@{/login}"><p>用户名:<input type="text" name="username"></p><p>密码:<input type="text" name="password"></p><p><input type="submit"></p></form></body>UserRealm的认证方法中添加假信息并且认证
//认证@Overrideprotected AuthenticationInfo doGetAuthenticationInfo(AuthenticationToken token) throws AuthenticationException {System.out.println("执行力=>认证doGetAuthenticationInfo");//用户String name = "root";String password = "root";UsernamePasswordToken userToken = (UsernamePasswordToken) token;if (!userToken.getUsername().equals(name)){return null;//抛出异常 UnknownAccountException}//密码认证"shiro做return new SimpleAuthenticationInfo("",password,"");}测试:用户输入登录信息
13.7、Shiro整合mybatis
导入相关依赖
<dependency><groupId>org.projectlombok</groupId><artifactId>lombok</artifactId></dependency><dependency><groupId>mysql</groupId><artifactId>mysql-connector-java</artifactId></dependency><dependency><groupId>log4j</groupId><artifactId>log4j</artifactId><version>1.2.17</version></dependency><dependency><groupId>com.alibaba</groupId><artifactId>druid</artifactId><version>1.1.23</version></dependency><dependency><groupId>org.mybatis.spring.boot</groupId> <artifactId>mybatis-spring-boot-starter</artifactId><version>2.1.3</version></dependency>编写配置文件
spring:datasource:username: rootpassword: rooturl: jdbc:mysql://localhost:3306/mybatis?useSSL=true&userUniceode=true&characterEncoding=utf8&serverTimezone=UTCdriver-class-name: com.mysql.cj.jdbc.Drivertype: com.alibaba.druid.pool.DruidDataSource#Spring Boot 默认是不注入这些属性值的,需要自己绑定#druid 数据源专有配置initialSize: 5minIdle: 5maxActive: 20maxWait: 60000timeBetweenEvictionRunsMillis: 60000minEvictableIdleTimeMillis: 300000validationQuery: SELECT 1 FROM DUALtestWhileIdle: truetestOnBorrow: falsetestOnReturn: falsepoolPreparedStatements: true#配置监控统计拦截的filters,stat:监控统计、log4j:日志记录、wall:防御sql注入#如果允许时报错java.lang.ClassNotFoundException: org.apache.log4j.Priority#则导入 log4j 依赖即可,Maven 地址:https://mvnrepository.com/artifact/log4j/log4jfilters: stat,wall,log4jmaxPoolPreparedStatementPerConnectionSize: 20useGlobalDataSourceStat: trueconnectionProperties: druid.stat.mergeSql=true;druid.stat.slowSqlMillis=500编写实体类
@Data@AllArgsConstructor@NoArgsConstructorpublic class User {private int id;private String name;private String pwd;}编写mapper和xml文件
@Repository@Mapperpublic interface UserMapper {public User queryUserByName(String name);}<mapper namespace="com.hwt.mapper.UserMapper"><select id="queryUserByName" resultType="User" parameterType="String">select * from user where name=#{name}</select></mapper>service和service的实现类
public interface UserService {public User queryUserByName(String name);}@Servicepublic class UserServiceImpl implements UserService{@AutowiredUserMapper userMapper;@Overridepublic User queryUserByName(String name) {return userMapper.queryUserByName(name);}}测试类中测试
@SpringBootTestclass ShiroSpringbootApplicationTests {@AutowiredUserService userService;@Testvoid contextLoads() {System.out.println(userService.queryUserByName("root"));}}Realm中获取数据库数据并且与前端传值进行比对
//认证@Overrideprotected AuthenticationInfo doGetAuthenticationInfo(AuthenticationToken token) throws AuthenticationException {System.out.println("执行力=>认证doGetAuthenticationInfo");//使用真实数据UsernamePasswordToken userToken = (UsernamePasswordToken)token;User user = userService.queryUserByName(userToken.getUsername());if(user==null){return null;}return new SimpleAuthenticationInfo("",user.getPwd(),"");}
13.8、Shiro请求授权的实现
ShiroConfig.java中,添加代码,注意要添加在(顺序)
filterMap.put("/user/add","perms[user:add]");正常的是要访问无权限页面的
现在去UserRealm中给添加权限
@Overrideprotected AuthorizationInfo doGetAuthorizationInfo(PrincipalCollection principalCollection) {System.out.println("执行了授权方法");SimpleAuthorizationInfo info = new SimpleAuthorizationInfo();info.addStringPermission("user:add");return info;}现在测试发现用户就有add权限了
怎样在数据库层面实现呢
首先添加一个权限字段perms

之后在类中新建这个字段
在UserRealm中为用户添加基于数据库的授权
//授权@Overrideprotected AuthorizationInfo doGetAuthorizationInfo(PrincipalCollection principalCollection) {System.out.println("执行了=>授权doGetAuthorizationInfo");SimpleAuthorizationInfo info = new SimpleAuthorizationInfo();//拿到当前用户信息Subject subject = SecurityUtils.getSubject();User currentUser = (User) subject.getPrincipal();//拿到数据库权限info.addStringPermission(currentUser.getPerms());return info;}13.9、Shiro和thymeleaf整合
导入shrio和thymeleaf结合的依赖
<dependency><groupId>com.github.theborakompanioni</groupId><artifactId>thymeleaf-extras-shiro</artifactId><version>2.0.0</version></dependency>在UserRealm类的认证登录中把session中放入user
Subject subject = SecurityUtils.getSubject();Session session = subject.getSession();session.setAttribute("loginUser",user);前端页面编写标签了,之前在security中用到的是sec,这里用的shiro
<html lang="en" xmlns:th="http://www.thymeleaf.org"xmlns:shiro="http://www.thymeleaf.org/thymeleaf-extras-shiro">修改前端页面
<div><div th:if="${session.loginUser==null}"><a th:href="@{/toLogin}">登录</a></div><p th:text="${msg}"></p><div shiro:hasPermission="user:add"><a th:href="@{/user/add}">add</a></div><div shiro:hasPermission="user:update"><a th:href="@{/user/update}">update</a></div></div>测试:登录后只显示当前啊用户有权限的操作
14、Swagger
14.1、Swagger简介
前后端分离
- 前端 -> 前端控制层、视图层
- 伪造后端数据,json已经存在,不需要后端,前端已经能跑起来
- 后端 -> 后端控制层、服务层、数据访问层
- 前后端通过API进行交互
- 前后端相对独立且松耦合
- 前后端可以部署在不同的服务器上
产生的问题
- 前后端集成,前端或者后端无法做到“及时协商,尽早解决”,最终导致问题集中爆发
解决方案
- 首先定义schema [ 计划的提纲 ],并实时跟踪最新的API,降低集成风险
- 早些年制定word计划文档
- 前后端分离:前端测试后端接口:postman
后端提供接口,需要实时更新最新的消息及改动!
Swagger
- 号称世界上最流行的API框架
- Restful Api 文档在线自动生成器 => API 文档 与API 定义同步更新
- 直接运行,在线测试API接口(其实就是controller requsetmapping)
- 支持多种语言 (如:Java,PHP等)
- 官网:https://swagger.io/
14.2、SpringBoot集成Swagger
14.2.1、环境搭建
SpringBoot集成Swagger => springfox,两个jar包
- Springfox-swagger2
- swagger-springmvc
使用Swagger
要求:jdk 1.8 + 否则swagger2无法运行
新建一个springBoot-web项目
添加maven依赖
<dependency><groupId>io.springfox</groupId><artifactId>springfox-swagger2</artifactId><version>2.9.2</version></dependency><dependency><groupId>io.springfox</groupId><artifactId>springfox-swagger-ui</artifactId><version>2.9.2</version></dependency>编写HelloController
@RestControllerpublic class HelloController {@RequestMapping("/hello")public String hello(){return "hello";}}编写一个配置类SwaggerConfig类配置Swagger
@Configuration@EnableSwagger2public class SwaggerConfig {}访问测试 :http://localhost:8080/swagger-ui.html ,可以看到swagger的界面;

14.2.2配置Swagger
Swagger实例Bean是Docket,所以通过配置Docket实例来配置Swagger,通过Docket对象接管了原来默认的配置
//配置Swagger文档信息=apiInfoprivate ApiInfo apiInfo() {Contact contact = new Contact("联系人名字", "http://xxx.xxx.com/联系人访问链接", "联系人邮箱");return new ApiInfo("Swagger", // 标题"配置Swagger", // 描述"v1.0", // 版本"https://swagger.io/", // 组织链接contact, // 联系人信息"Apach 2.0 许可", // 许可"许可链接", // 许可连接new ArrayList<>()// 扩展);}通过apiInfo()属性配置文档信息
@Bean //配置docket以配置Swagger具体参数public Docket docket() {return new Docket(DocumentationType.SWAGGER_2).apiInfo(apiInfo());}Docket 实例关联上 apiInfo()

14.2.3配置扫描接口
构建Docket时通过select()方法配置怎么扫描接口。
@Bean //配置docket以配置Swagger具体参数public Docket docket() {return new Docket(DocumentationType.SWAGGER_2).apiInfo(apiInfo()).select().apis(RequestHandlerSelectors.basePackage("com.hwt.swagger.controller")).build();}空行处可以使用的全部参数
//RequestHandlerSelectors配置接口扫面的方式
//basePackage指定扫描的包
//any() // 扫描所有,项目中的所有接口都会被扫描到
//none() // 不扫描接口
//通过方法上的注解扫描,如withMethodAnnotation(GetMapping.class)只扫描get请求
//withMethodAnnotation(final Class14.2.4配置Swagger开关通过enable是否启动swagger 如果是false 则swagger不能在浏览器中使用
@Bean //配置docket以配置Swagger具体参数public Docket docket() {return new Docket(DocumentationType.SWAGGER_2).apiInfo(apiInfo()).enable(false)//enable是否启动swagger 如果是false 则swagger不能在浏览器中使用.select().apis(RequestHandlerSelectors.basePackage("com.hwt.swagger.controller")).build();}如何动态配置当项目处于test、dev环境时显示swagger,处于prod时不显示?
- 判断是不是生产环境flag=false
- 注入enable(flag)
分别配置pro和dev的端口号为8081和8082
然后在docket类中进行判断
@Bean //配置docket以配置Swagger具体参数public Docket docket(Environment environment) {// 设置要是示的Swagger环境Profiles profiles = Profiles.of("dev","test");// 获取项目的环境// 通过environment.acceptsProfiles 判断是否处于自己设定的环境当中boolean flag = environment.acceptsProfiles(profiles);return new Docket(DocumentationType.SWAGGER_2).apiInfo(apiInfo()).enable(flag)//enable是否启动swagger 如果是false 则swagger不能在浏览器中使用.select().apis(RequestHandlerSelectors.basePackage("com.hwt.swagger.controller")).build();}14.2.5配置API分组
多个分组:只需要多个
Docket实例即可@Beanpublic Docket docket1(){return new Docket(DocumentationType.SWAGGER_2).groupName("a");}@Beanpublic Docket docket2(){return new Docket(DocumentationType.SWAGGER_2).groupName("b");}@Beanpublic Docket docket3(){return new Docket(DocumentationType.SWAGGER_2).groupName("c");}测试:

14.2.6实体配置
新建一个实体类
public class User {public String username;public String password;}实体在请求接口的返回值上(即使是泛型),都能映射到实体项中:
@PostMapping(value = "/user")public User user(){return new User();}
增加注释
@ApiModel("用户实体")public class User {@ApiModelProperty("用户名")public String username;@ApiModelProperty("密码")public String password;}
注:并不是因为@ApiModel这个注解让实体显示在这里了,而是只要出现在接口方法的返回值上的实体都会显示在这里,而@ApiModel和@ApiModelProperty这两个注解只是为实体添加注释的。
@ApiModel为类添加注释
@ApiModelProperty为类属性添加注释
14.3常用注解
Swagger的所有注解定义在io.swagger.annotations包下
下面列一些经常用到的,未列举出来的可以另行查阅说明:
Swagger注解 简单说明 @Api(tags = “xxx模块说明”) 作用在模块类上 @ApiOperation(“xxx接口说明”) 作用在接口方法上 @ApiModel(“xxxPOJO说明”) 作用在模型类上:如VO、BO @ApiModelProperty(value = “xxx属性说明”,hidden = true) 作用在类方法和属性上,hidden设置为true可以隐藏该属性 @ApiParam(“xxx参数说明”) 作用在参数、方法和字段上,类似@ApiModelProperty 给请求的接口配置一些注释
//Operation接口,不是放在类上是方法@ApiOperation("get测试类")@GetMapping("/t2")public String t1(@ApiParam("这个名字会被返回")String username){return username;}@ApiOperation("post测试类")@PostMapping("/t2")public String t2(@ApiParam("这个名字会被返回")String name){int i = 2/0;return name;}这样的话,可以给一些比较难理解的属性或者接口,增加一些配置信息,让人更容易阅读!
相较于传统的Postman或Curl方式测试接口,使用swagger简直就是傻瓜式操作,不需要额外说明文档(写得好本身就是文档)而且更不容易出错,只需要录入数据然后点击Execute,如果再配合自动化框架,可以说基本就不需要人为操作了。
Swagger是个优秀的工具,现在国内已经有很多的中小型互联网公司都在使用它,相较于传统的要先出Word接口文档再测试的方式,显然这样也更符合现在的快速迭代开发行情。当然了,提醒下大家在正式环境要记得关闭Swagger,一来出于安全考虑二来也可以节省运行时内存。
15、任务
15.1异步任务
所谓异步,在某些功能实现时可能要花费一定的时间,但是为了不影响客户端的体验,选择异步执行
创建一个service
@Servicepublic class AsynService {public void hello(){try {Thread.sleep(3000);} catch (InterruptedException e) {e.printStackTrace();}System.out.println("数据正在处理。。。");}}创建一个controller
@RestControllerpublic class AsynController {@AutowiredAsynService asynService;@RequestMapping("/hello")public String hello(){asynService.hello();return "ok";}}测试,在执行是等待三秒才执行
实现异步需要告诉sprng这个方法是异步的,在方法加上注解
@RestControllerpublic class AsynController {@AutowiredAsynService asynService;@RequestMapping("/hello")public String hello(){asynService.hello();return "ok";}}在SpringBoot主程序开启异步注解的功能
@EnableAsync//开启异步注解功能@SpringBootApplicationpublic class Springboot09TestApplication {public static void main(String[] args) {SpringApplication.run(Springboot09TestApplication.class, args);}}测试页面先出来 3秒后才打印数据正在处理。。。
15.2邮件任务
邮件发送,在我们的日常开发中,也非常的多,Springboot也帮我们做了支持
- 邮件发送需要引入spring-boot-start-mail
- SpringBoot 自动配置MailSenderAutoConfiguration
- 定义MailProperties内容,配置在application.yml中
- 自动装配JavaMailSender
- 测试邮件发送
导入依赖
<dependency><groupId>org.springframework.boot</groupId><artifactId>spring-boot-starter-mail</artifactId></dependency>设置自己的邮箱
spring.mail.username=xxxxxxxx@qq.comspring.mail.password=xxxxxxxxxxxxspring.mail.host=smtp.qq.com#开启加密验证spring.mail.properties.mail.smtp.ssl.enable=true发送简单邮件
@Testvoid contextLoads() {SimpleMailMessage mailMessage = new SimpleMailMessage();mailMessage.setSubject("测试");mailMessage.setText("6666");mailMessage.setTo("xxxxxxxx@qq.com");mailMessage.setFrom("xxxxxxxxx@qq.com");mailSender.send(mailMessage);}发送发杂邮件(带附件的文件)
@Testvoid contextLoads2() throws MessagingException {//一个复杂邮件MimeMessage mimeMessage = mailSender.createMimeMessage();//组装MimeMessageHelper helper =new MimeMessageHelper(mimeMessage,true);helper.setSubject("测试");helper.setText("6666");//附件helper.addAttachment("1.jpg",new File("D:\\1.jpg"));helper.addAttachment("2.jpg",new File("D:\\1.jpg"));helper.setTo("2813068665@qq.com");helper.setFrom("2813068665@qq.com");mailSender.send(mimeMessage);}
15.3定时任务
项目开发中经常需要执行一些定时任务,比如需要在每天凌晨的时候,分析一次前一天的日志信息,Spring为我们提供了异步执行任务调度的方式,提供了两个接口。
- TaskExecutor接口 任务调度者
- TaskScheduler接口 任务执行者
两个注解:
- @EnableScheduling 开启定时功能的注释
- @Scheduled 什么时候执行
定时功能注解在springboot主方法中开启定时功能注解
@EnableAsync//开启异步注解功能@EnableScheduling//开启定时功能的注解@SpringBootApplicationpublic class Springboot09TestApplication {public static void main(String[] args) {SpringApplication.run(Springboot09TestApplication.class, args);}}开启注解并且使用使用cron表达式操作定时任务
@Servicepublic class ScheduledService {//在一个特定的时间执行这个方法Timer// cron 表达式~// 秒分 时日月周几@Scheduled(cron = "0 47 14 * * " />)public void hello(){System.out.println("hello,你被执行了");}}测试
cron表达式:https://www.cnblogs.com/javahr/p/8318728.html
16、分布式 Dubbo+Zooker
16.1、什么是分布式系统?
在《分布式系统原理与范型》一书中有如下定义:“分布式系统是若干独立计算机的集合,这些计算机对于用户来说就像单个相关系统”;
分布式系统是由一组通过网络进行通信、为了完成共同的任务而协调工作的计算机节点组成的系统。分布式系统的出现是为了用廉价的、普通的机器完成单个计算机无法完成的计算、存储任务。其目的是利用更多的机器,处理更多的数据。
分布式系统(distributed system)是建立在网络之上的软件系统。
首先需要明确的是,只有当单个节点的处理能力无法满足日益增长的计算、存储任务的时候,且硬件的提升(加内存、加磁盘、使用更好的CPU)高昂到得不偿失的时候,应用程序也不能进一步优化的时候,我们才需要考虑分布式系统。因为,分布式系统要解决的问题本身就是和单机系统一样的,而由于分布式系统多节点、通过网络通信的拓扑结构,会引入很多单机系统没有的问题,为了解决这些问题又会引入更多的机制、协议,带来更多的问题。。。
RPC:
RPC【Remote Procedure Call】是指远程过程调用,是一种进程间通信方式,他是一种技术的思想,而不是规范。它允许程序调用另一个地址空间(通常是共享网络的另一台机器上)的过程或函数,而不用程序员显式编码这个远程调用的细节。即程序员无论是调用本地的还是远程的函数,本质上编写的调用代码基本相同。
也就是说两台服务器A,B,一个应用部署在A服务器上,想要调用B服务器上应用提供的函数/方法,由于不在一个内存空间,不能直接调用,需要通过网络来表达调用的语义和传达调用的数据。为什么要用RPC呢?就是无法在一个进程内,甚至一个计算机内通过本地调用的方式完成的需求,比如不同的系统间的通讯,甚至不同的组织间的通讯,由于计算能力需要横向扩展,需要在多台机器组成的集群上部署应用。RPC就是要像调用本地的函数一样去调远程函数;
RPC两个核心模块:通讯,序列化。
Dubbo:
Apache Dubbo |ˈdʌbəʊ| 是一款高性能、轻量级的开源Java RPC框架,它提供了三大核心能力:面向接口的远程方法调用,智能容错和负载均衡,以及服务自动注册和发现。

Dubbo 作为一款微服务框架,最重要的是向用户提供跨进程的 RPC 远程调用能力。如上图所示,Dubbo 的服务消费者(Consumer)通过一系列的工作将请求发送给服务提供者(Provider)。
为了实现这样一个目标,Dubbo 引入了注册中心(Registry)组件,通过注册中心,服务消费者可以感知到服务提供者的连接方式,从而将请求发送给正确的服务提供者。
服务提供者(Provider):暴露服务的服务提供方,服务提供者在启动时,向注册中心注册自己提供的服务。
服务消费者(Consumer):调用远程服务的服务消费方,服务消费者在启动时,向注册中心订阅自己所需的服务,服务消费者,从提供者地址列表中,基于软负载均衡算法,选一台提供者进行调用,如果调用失败,再选另一台调用。
注册中心(Registry):注册中心返回服务提供者地址列表给消费者,如果有变更,注册中心将基于长连接推送变更数据给消费者
监控中心(Monitor):服务消费者和提供者,在内存中累计调用次数和调用时间,定时每分钟发送一次统计数据到监控中心
调用关系说明
l 服务容器负责启动,加载,运行服务提供者。
l 服务提供者在启动时,向注册中心注册自己提供的服务。
l 服务消费者在启动时,向注册中心订阅自己所需的服务。
l 注册中心返回服务提供者地址列表给消费者,如果有变更,注册中心将基于长连接推送变更数据给消费者。
l 服务消费者,从提供者地址列表中,基于软负载均衡算法,选一台提供者进行调用,如果调用失败,再选另一台调用。
l 服务消费者和提供者,在内存中累计调用次数和调用时间,定时每分钟发送一次统计数据到监控中心。
16.2、windows下安装zookeeper
- 下载zookeeper :地址, 我们下载3.4.14 , 最新版!解压zookeeper
- 运行/bin/zkServer.cmd ,初次运行会报错,没有zoo.cfg配置文件;
可能碰到的问题:闪退
解决方案:编辑zkServer.cmd文件末尾添加pause 。这样运行出错就不会退出,会提示错误信息,方便 找到原因。
修改zoo.cfg配置文件
将conf文件夹下面的zoo_sample.cfg复制一份改名为zoo.cfg即可。
注意几个重要位置:
dataDir=./ 临时数据存储的目录(可写相对路径)
clientPort=2181 zookeeper的端口号
修改完成后再次启动zookeeper
启动zkCli.cmd测试
ls/ :列出列出zookeeper根下保存的所有节点
create –e /hwt 666:创建一个hwt节点,值为666

16.3、window下安装dubbo-admin
dubbo本身不是一个服务软件。它其实就是一个jar包,能够帮你的java程序连接到zookeeper,并利用zookeeper消费、提供服务。
但是为了让用户更好的管理监控众多的dubbo服务,官方提供了一个可视化的监控程序dubbo-admin,不过这个监控即使不装也不影响使用。
安装:
下载:https://github.com/apache/dubbo-admin/tree/master
解压到环境目录
修改 dubbo-admin\src\main\resources \application.properties 指定zookeeper地址
server.port=7001spring.velocity.cache=falsespring.velocity.charset=UTF-8spring.velocity.layout-url=/templates/default.vmspring.messages.fallback-to-system-locale=falsespring.messages.basename=i18n/messagespring.root.password=rootspring.guest.password=guestdubbo.registry.address=zookeeper://127.0.0.1:2181在项目目录下打包dubbo-admin
mvn clean package -Dmaven.test.skip=true执行 dubbo-admin\target 下的dubbo-admin-0.0.1-SNAPSHOT.jar
java -jar dubbo-admin-0.0.1-SNAPSHOT.jar执行完毕,我们去访问一下 http://localhost:7001/ , 这时候我们需要输入登录账户和密码,我们都是默认的root-root;
登录成功后,查看界面

17、SpringBoot + Dubbo + zookeeper
17.1、框架搭建:
启动zookeeper !
IDEA创建一个空项目;
创建一个模块,实现服务提供者:provider-server , 选择web依赖即可
项目创建完毕,我们写一个服务,比如卖票的服务;
编写接口
public interface TicketService {public String getTicket();}编写实现类
@Service //将服务发布出去@Component //放在容器中public class TicketServiceImpl implements TicketService{@Overridepublic String getTicket() {return "SpringBoot + Dubbo + zookeeper";}}创建一新的个模块,实现服务消费者:consumer-server , 选择web依赖即可
.项目创建完毕,我们写一个服务,比如用户的服务;
package com.guo.consumer.service;public class UserService { //我们需要去拿去注册中心的服务}
17.2、服务提供者:
将服务提供者注册到注册中心,我们需要整合Dubbo和zookeeper,所以需要导包
我们从dubbo官网进入github,看下方的帮助文档,找到dubbo-springboot,找到依赖包
<!-- Dubbo Spring Boot Starter --><dependency> <groupId>org.apache.dubbo</groupId> <artifactId>dubbo-spring-boot-starter</artifactId> <version>2.7.3</version></dependency>zookeeper的包我们去maven仓库下载,zkclient;
<!-- https://mvnrepository.com/artifact/com.github.sgroschupf/zkclient --><dependency> <groupId>com.github.sgroschupf</groupId> <artifactId>zkclient</artifactId> <version>0.1</version></dependency>【新版的坑】zookeeper及其依赖包,解决日志冲突,还需要剔除日志依赖;
<!-- 引入zookeeper --><dependency> <groupId>org.apache.curator</groupId> <artifactId>curator-framework</artifactId> <version>2.12.0</version></dependency><dependency> <groupId>org.apache.curator</groupId> <artifactId>curator-recipes</artifactId> <version>2.12.0</version></dependency><dependency> <groupId>org.apache.zookeeper</groupId> <artifactId>zookeeper</artifactId> <version>3.4.14</version> <!--排除这个slf4j-log4j12--> <exclusions> <exclusion> <groupId>org.slf4j</groupId> <artifactId>slf4j-log4j12</artifactId> </exclusion> </exclusions></dependency>在springboot配置文件中配置dubbo相关属性!
#当前应用名字dubbo.application.name=provider-server#注册中心地址dubbo.registry.address=zookeeper://127.0.0.1:2181#扫描指定包下服务dubbo.scan.base-packages=com.hwt.service在service的实现类中配置服务注解,发布服务!注意导包问题,因为这里的Service注解需要导入的是dubbo中的注解,而不是spring的注解,所以要把其注入就要用Componet,不过最新版本的好像已经解决这个问题:一个新的注解@DubboService
@Service //将服务发布出去@Component //放在容器中public class TicketServiceImpl implements TicketService{@Overridepublic String getTicket() {return "SpringBoot + Dubbo + zookeeper";}}测试运行,需要提前打开zookeepr服务

可以看到服务已经存在了
逻辑理解 :应用启动起来,dubbo就会扫描指定的包下带有@component注解的服务,将它发布在指定的注册中心中!
17.3、服务消费者
导入依赖,和之前的依赖一样;
<dependency><groupId>org.apache.dubbo</groupId><artifactId>dubbo-spring-boot-starter</artifactId><version>2.7.3</version></dependency><dependency><groupId>com.github.sgroschupf</groupId><artifactId>zkclient</artifactId><version>0.1</version></dependency><dependency><groupId>org.apache.curator</groupId><artifactId>curator-framework</artifactId><version>2.12.0</version></dependency><dependency><groupId>org.apache.curator</groupId><artifactId>curator-recipes</artifactId><version>2.12.0</version></dependency><dependency><groupId>org.apache.zookeeper</groupId><artifactId>zookeeper</artifactId><version>3.4.14</version><exclusions><exclusion><groupId>org.slf4j</groupId><artifactId>slf4j-log4j12</artifactId></exclusion></exclusions></dependency>配置参数
server.port=8002#当前应用名字dubbo.application.name=consumer-server#注册中心地址dubbo.registry.address=zookeeper://127.0.0.1:2181本来正常步骤是需要将服务提供者的接口打包,然后用pom文件导入,我们这里使用简单的方式,直接将服务的接口拿过来,路径必须保证正确,即和服务提供者相同;
package com.hwt.service;import org.springframework.stereotype.Service;@Servicepublic interface TicketService {public String getTicket();}完善消费者的服务类
package com.hwt.service;import org.apache.dubbo.config.annotation.Reference;import org.springframework.stereotype.Service;@Service//放到容器中public class UserService {//拿到provider-service提供的票,要去注册中心拿到服务@Reference//引用pom坐标可以定义路径相同的接口名TicketService ticketService;public void buyTicket(){String ticket = ticketService.getTicket();System.out.println("在注册中心拿到:" + ticket);}}测试类编写
@SpringBootTestclass ConsumerServiceApplicationTests {@AutowiredUserService userService;@Testvoid contextLoads() {userService.buyTicket();}}运行测试类拿到SpringBoot + Dubbo + zookeeper
[外链图片转存失败,源站可能有防盗链机制,建议将图片保存下来直接上传(img-AmLac0SU-1678702901823)(E:\笔记\typora-user-images\image-20230313175514593.png)]
upId>
zkclient
0.1【新版的坑】zookeeper及其依赖包,解决日志冲突,还需要剔除日志依赖;```java org.apache.curator curator-framework 2.12.0 org.apache.curator curator-recipes 2.12.0 org.apache.zookeeper zookeeper 3.4.14 org.slf4j slf4j-log4j12在springboot配置文件中配置dubbo相关属性!
#当前应用名字dubbo.application.name=provider-server#注册中心地址dubbo.registry.address=zookeeper://127.0.0.1:2181#扫描指定包下服务dubbo.scan.base-packages=com.hwt.service在service的实现类中配置服务注解,发布服务!注意导包问题,因为这里的Service注解需要导入的是dubbo中的注解,而不是spring的注解,所以要把其注入就要用Componet,不过最新版本的好像已经解决这个问题:一个新的注解@DubboService
@Service //将服务发布出去@Component //放在容器中public class TicketServiceImpl implements TicketService{@Overridepublic String getTicket() {return "SpringBoot + Dubbo + zookeeper";}}测试运行,需要提前打开zookeepr服务
[外链图片转存中…(img-dNldBr94-1678702901822)]
可以看到服务已经存在了
逻辑理解 :应用启动起来,dubbo就会扫描指定的包下带有@component注解的服务,将它发布在指定的注册中心中!
17.3、服务消费者
导入依赖,和之前的依赖一样;
<dependency><groupId>org.apache.dubbo</groupId><artifactId>dubbo-spring-boot-starter</artifactId><version>2.7.3</version></dependency><dependency><groupId>com.github.sgroschupf</groupId><artifactId>zkclient</artifactId><version>0.1</version></dependency><dependency><groupId>org.apache.curator</groupId><artifactId>curator-framework</artifactId><version>2.12.0</version></dependency><dependency><groupId>org.apache.curator</groupId><artifactId>curator-recipes</artifactId><version>2.12.0</version></dependency><dependency><groupId>org.apache.zookeeper</groupId><artifactId>zookeeper</artifactId><version>3.4.14</version><exclusions><exclusion><groupId>org.slf4j</groupId><artifactId>slf4j-log4j12</artifactId></exclusion></exclusions></dependency>配置参数
server.port=8002#当前应用名字dubbo.application.name=consumer-server#注册中心地址dubbo.registry.address=zookeeper://127.0.0.1:2181本来正常步骤是需要将服务提供者的接口打包,然后用pom文件导入,我们这里使用简单的方式,直接将服务的接口拿过来,路径必须保证正确,即和服务提供者相同;
package com.hwt.service;import org.springframework.stereotype.Service;@Servicepublic interface TicketService {public String getTicket();}完善消费者的服务类
package com.hwt.service;import org.apache.dubbo.config.annotation.Reference;import org.springframework.stereotype.Service;@Service//放到容器中public class UserService {//拿到provider-service提供的票,要去注册中心拿到服务@Reference//引用pom坐标可以定义路径相同的接口名TicketService ticketService;public void buyTicket(){String ticket = ticketService.getTicket();System.out.println("在注册中心拿到:" + ticket);}}测试类编写
@SpringBootTestclass ConsumerServiceApplicationTests {@AutowiredUserService userService;@Testvoid contextLoads() {userService.buyTicket();}}运行测试类拿到SpringBoot + Dubbo + zookeeper

- 如果-那么: