这里给大家分享我在网上总结出来的一些知识,希望对大家有所帮助
最近喜欢研究起了手表,对劳力士这款“百事圈”实在是心水的不行啊!
心痒难耐无奈钱包不支持,作为一个前端程序员,买不起的东西该怎么办?
当然是自己做一个啊!
说干就干,熬夜自己做了个“百事圈”出来!源码在最后!
先看成品
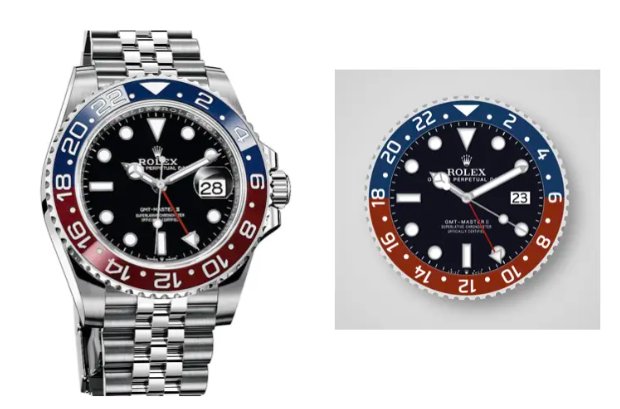
还是有那么六七成相像了吧!主要还是在颜色选择和细节处理上要花些功夫,无奈通过单纯的平面很难展现出“材质感”。
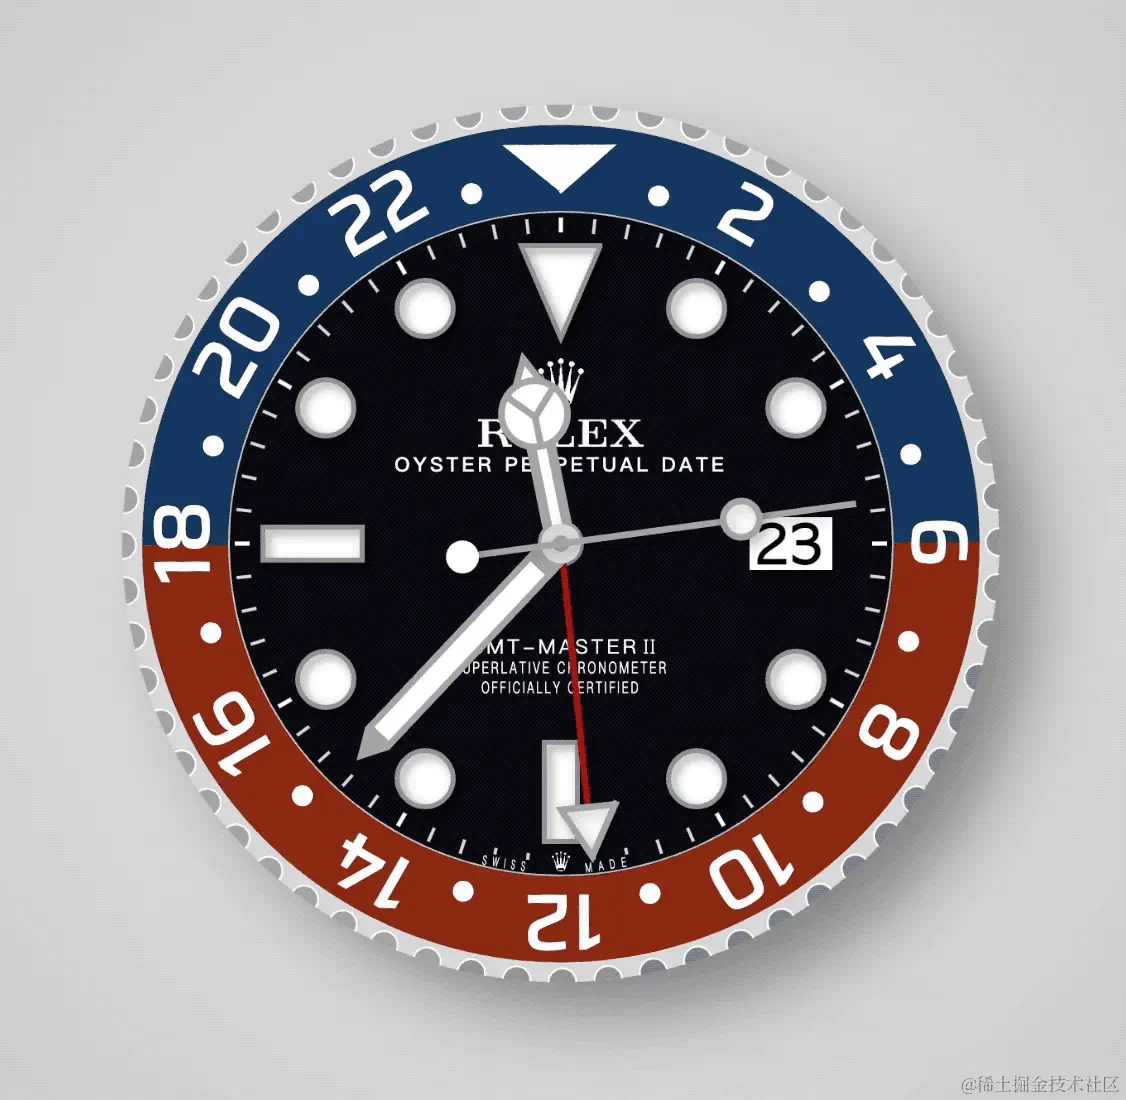
虽然质感比不上人家吧,但咱们这个走时精准度肯定比那钢砣子强不是🐶。
除了实现了手表的“走时”这个基础功能外,还把日历窗、GMT双时区功能、外圈旋转功能也一并实现啦!图片里不好展示,大家可以看完文章,自行领取源码来玩玩!
实现思路
本想想用尽量多的CSS来实现,但CSS实现这种较为复杂的动态功能还是有些头疼,所以还是把思路放到了用canvas来实现。
小小构思后手表被分为三个模块:
表盘
表圈
- 表针
先在html结构中建立三个canvas标签:
并在JS中响应地对三个canvas进行初始化。 每个canvas画布绘制的第一步,我们首先用
getContext("2d")方法来获取到canvas画布的二维渲染上下文,并且为了能让画面清晰度更高,我们使用.scale()方法对canvas进行四倍缩放,这样我们可以得到一个清晰度更高的canvas画布:const watchBox = document.querySelector(".watch-box");const watchPointer = document.querySelector("#watchPointer");const dial = document.querySelector("#dial");const bezel = document.querySelector("#bezel");const ctx = watchPointer.getContext("2d");const dialCtx = dial.getContext("2d");const bezelCtx = bezel.getContext("2d");const ratio = 4;ctx.scale(ratio, ratio);dialCtx.scale(ratio, ratio);bezelCtx.scale(ratio, ratio);鉴于我们的手表中包含了不少颜色,这些颜色都会在canvas绘制中使用到,所以我们先把颜色存储在变量中方便后续使用:
// 初始化颜色变量const gmtBezelRed = "#8a2811";const blue = "#133760";const black = "#10111e";const white = "#fff";const grayD = "#ddd";const grayC = "#ccc";const grayB = "#bbb";const grayA = "#aaa";const gray9 = "#999";const gray8 = "#888";const gmtPointerRed = "#aa0d0f";const transparent = "grba(0,0,0,255)";好,准备部分做完了,我们开始正题!构建绘制方法
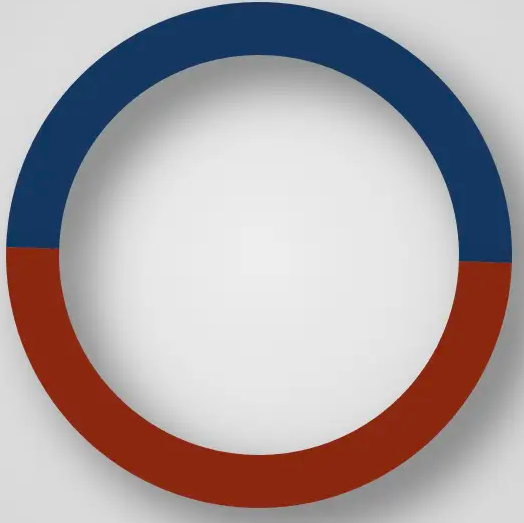
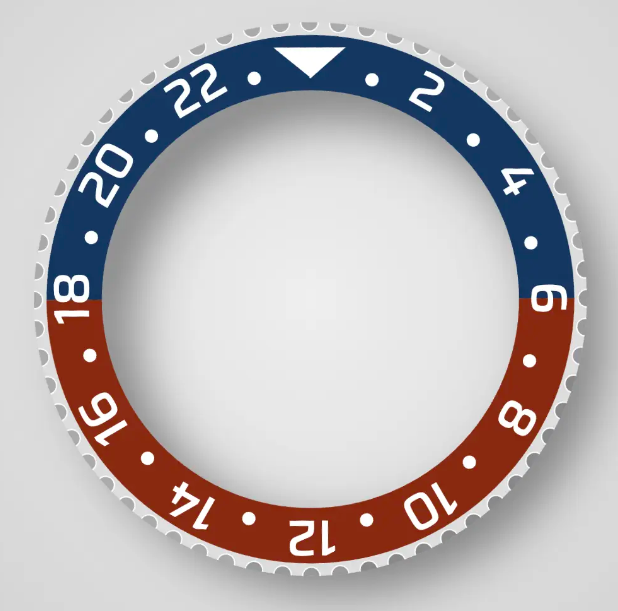
drawGmtBezel,首先对最简单的表圈部分进行绘制:// 绘制表圈function drawGmtBezel() { // 设置中心点,此时225,225变成了坐标的0,0 bezelCtx.translate(225, 225); // 阴影的x偏移 bezelCtx.shadowOffsetX = 50; // 阴影的y偏移 bezelCtx.shadowOffsetY = 50; // 阴影颜色 bezelCtx.shadowColor = "rgba(0, 0, 0, 0.5)"; // 阴影的模糊半径 bezelCtx.shadowBlur = 100; /** * 绘制陶瓷表圈 * @param {CanvasRenderingContext2D} bezelCtx * @param {number} begin * @param {number} end * @param {string} color * @returns **/ const drawCeramicCircle = (bezelCtx, begin, end, color) => { bezelCtx.beginPath(); bezelCtx.lineWidth = 26.5; bezelCtx.arc(0, 0, 113.25, begin, end); bezelCtx.strokeStyle = color; bezelCtx.stroke(); bezelCtx.closePath(); } // 画上表圈(蓝) drawCeramicCircle(bezelCtx, Math.PI, 2 * Math.PI, blue) // 画下表圈(红) drawCeramicCircle(bezelCtx, 0, Math.PI, gmtBezelRed)}目前的代码只是绘制出了双色表圈:
我们首先使用
bezelCtx.translate(225, 225)来设置画布的原始点,由于我们要画的是圆心在画布中心点的表圈,所以我们把画布原始点设置到225, 225这个画布中心点的位置。之所以是225这个数字,是因为我们在canvas标签中将canvas大小设置为1800×1800,又在canvas初始化时把scale设置为4倍缩放,所以画布分辨率实际上就是1800/4,也就是450×450像素,中心点自然就是
225, 225了。随后我们对表圈部分的阴影进行设置,这里就不用我多介绍啦,和CSS的box-shadow逻辑是一样的。
接下来就是绘制的部分了,我们再来看看代码:
const drawCeramicCircle = (bezelCtx, color, begin, end) => { bezelCtx.beginPath(); bezelCtx.lineWidth = 26.5; bezelCtx.arc(0, 0, 113.25, begin, end); bezelCtx.strokeStyle = color; bezelCtx.stroke(); bezelCtx.closePath();}我们首先用
beginPath方法来开始一个新路径,可以理解为调用一只新“画笔”,我们在canvas中的所有线条绘制都要靠这个“画笔”来进行。思路其实很简单,每个画面都是由一笔一画的基础元素组成的,我们需要对这些基础元素进行拆解,每一笔不一样的笔触都需要换一只新笔,然后设置这只笔的各种属性,最后再进行绘画。
我们随后就使用
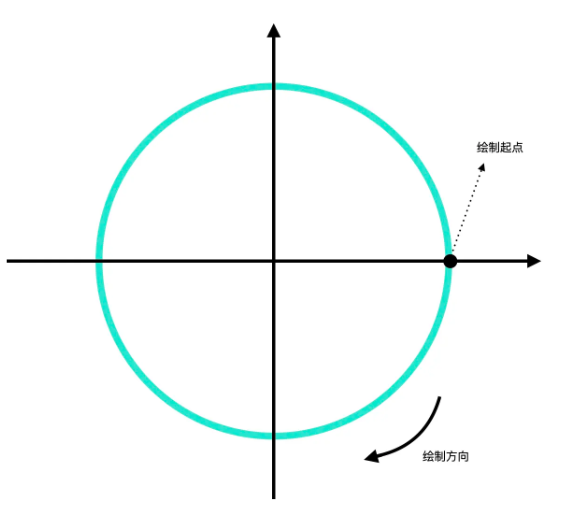
lineWidth()和strokeStyle()设置这只“画笔”的粗细、颜色属性,并且使用arc方法来绘制一个“弧形”,这个arc方法接收五个参数:圆心的 x 轴坐标、圆心的 y 轴坐标、圆弧的半径、圆弧的起始点、圆弧的终点。我们在前面已经把画布的起始点设置为画布中心了,所以前两个圆心参数我们都传入0,半径就选用113.25这个数字(纯为了比例协调),起点和终点的设置就需要稍微计算一下了,所谓的“圆弧起始点”默认是x轴上右侧的半径切点:
所以如果我们要先画“下半圈”的话,起点也就是
0,终点也就是在x轴的左侧。这两个参数的单位都是“弧度”,一个半圆对应的弧度也就是PI,所以下半圆的起始点是0,终点是PI。按照这样调用方法
drawCeramicCircle(bezelCtx, 0, Math.PI, gmtBezelRed),看看效果:
没问题,我们再用同样的逻辑
drawCeramicCircle(bezelCtx, Math.PI, 2 * Math.PI, blue)制作上半圈:
最后我们用
stroke方法来进行绘制,图像就被绘制出来了!这就实现啦,逻辑其实不过就是这样:新建路径(画笔)—> 设置路径属性 —> 设置路径信息 —> 绘制。
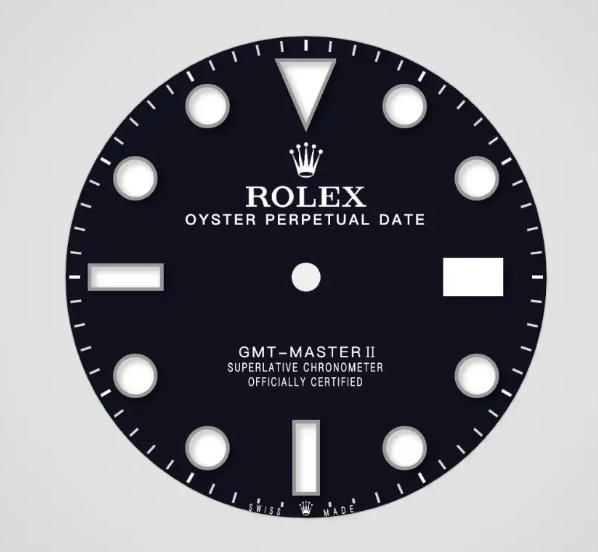
表盘的逻辑也是一致,只要你稍微掌握如何在canvas中绘制矩形、线条,实现起来其实没有什么难度,我们直接快进到表针部分:
function drawWatchPointer() { // 设置中心点,此时225, 225变成了坐标的0,0 ctx.translate(225, 225); // 获取当前时分秒 let time = new Date(); let day = time.getDate(); let hour = time.getHours() % 12; let min = time.getMinutes(); let second = time.getSeconds(); let millsecond = time.getMilliseconds(); // 时针 ctx.rotate(((2 * Math.PI) / 12) * hour + ((2 * Math.PI) / 12) * (min / 60) - Math.PI / 2); ctx.beginPath(); ctx.lineWidth = 3; ctx.fillStyle = white; ctx.fillRect(0, -4, 40, 8); ctx.strokeStyle = grayA; ctx.strokeRect(0, -3, 40, 6); ctx.closePath(); // 奔驰针头上三角 ctx.beginPath(); ctx.moveTo(48, -4.5); ctx.lineTo(57, 0); ctx.lineTo(48, 4.5); ctx.lineWidth = 2; ctx.strokeStyle = grayA; ctx.fillStyle = white; ctx.fill(); ctx.stroke(); ctx.closePath(); // 绘制奔驰针 ctx.beginPath(); ctx.arc(40, 0, 10, 0, 2 * Math.PI); ctx.fillStyle = white; ctx.lineWidth = 2; ctx.strokeStyle = grayA; ctx.fill(); ctx.stroke(); ctx.closePath(); ctx.beginPath(); ctx.moveTo(30, 0); ctx.lineTo(39, 0); ctx.lineTo(46.5, 7); ctx.lineTo(39, 0); ctx.lineTo(46.5, -7); ctx.lineWidth = 2; ctx.strokeStyle = grayA; ctx.stroke(); ctx.closePath();}其实可以看到,整体逻辑和画表圈并没有什么不同,只是有一些新的方法需要学习。我们还是顺着逻辑走一遍:
- 设置画布中心点为
255, 255- 通过
new Date()获取当前时间- 表针其实就是一个固定的矩形,只是需要改变矩形的旋转就可以表示时间。所以通过
((2 * Math.PI) / 12) * hour + ((2 * Math.PI) / 12) * (min / 60) - Math.PI / 2来计算出当前时间对于时针来说需要旋转的角度并传参给rotate方法,使用rotate方法可以旋转绘制的角度- 新建路径,并设置路径属性(粗细、颜色)
- 使用
fillRect来绘制矩形,四个参数分别代表x起始点、y起始点、宽、高- 结束表针本体的绘制,使用
closePath来清除画笔信息。接下来绘制表针的针头(三角形)- 使用
moveTo方法来移动画笔起始位置- 使用
lineTo方法来从画笔起始位置绘制一条直线,参数为直线终点的x和y- 连续绘制三条直线,形成三角形
- 使用
fill来填充矩形内部的颜色- 结束表针本体的绘制,使用
closePath来清除画笔信息。接下来绘制表针的奔驰针部分(圆形)- …
可以看到,其实使用逻辑都是一样的,不过就是上面说的这些,你可以自己尝试一下把分针和秒针给实现出来,应该就会对canvas有个基本的认识啦。
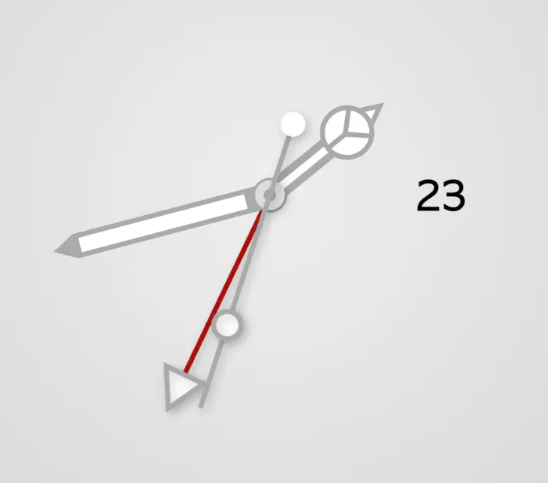
时针的实现效果:
完整源码
Canvas的基础知识都是比较零碎但深度普遍不深的,我就不带着大家把每个实现都过一遍了,直接把源码拿出来,大家随意取用!
可以试着在这个源码基础上,把自己喜欢的别的表也给做出来,做这玩意有种玩“我的世界”的快感,快来试试吧!
熬夜写的代码比较匆忙,还有很大的优化空间,我就以此抛砖引玉啦:
Rolex GMT-MASTER @font-face { font-family: "Optima"; src: url("fonts/Optima.ttc"); } @font-face { src: url("./fonts/Palatino.ttc"); font-family: "Trebuchet MS"; } @font-face { font-family: "Nunito Sans"; src: url("./fonts/NunitoSans-Regular.ttf"); } body { margin: 0; } .watch-box { width: 100vw; height: 100vh; display: flex; justify-content: center; align-items: center; background: radial-gradient(circle, #eee, #ccc, #aaa, #777); } h2 { position: absolute; top: 0; font-family: "Nunito Sans"; } canvas { position: absolute; transform: scale(0.25); } #bezel { z-index: 0; font-weight: bold; font-stretch: 0px; } #dial { z-index: 1; letter-spacing: 0.5px; } #watchPointer { z-index: 2; }const watchBox = document.querySelector(".watch-box"); const watchPointer = document.querySelector("#watchPointer"); const dial = document.querySelector("#dial"); const bezel = document.querySelector("#bezel"); const ctx = watchPointer.getContext("2d"); const dialCtx = dial.getContext("2d"); const bezelCtx = bezel.getContext("2d"); const ratio = 4; ctx.scale(ratio, ratio); dialCtx.scale(ratio, ratio); bezelCtx.scale(ratio, ratio); const logo = new Image(); const rolexLogo = new Image(); const imgResources = [logo, rolexLogo]; rolexLogo.src = "./images/rolex.png"; logo.src = "./images/logo.png"; // 图片资源加载后绘制表盘 const renderDrawDial = (() => { let imageOnloadSuccessCount = 0; return () => { imageOnloadSuccessCount ++; if (imageOnloadSuccessCount >= imgResources.length) { // 图片资源加载完毕 drawDial(); drawGmtBezel(); setInterval(drawWatchPointer, 100); } } })() rolexLogo.onload = renderDrawDial; logo.onload = renderDrawDial; const gmtBezelRed = "#8a2811"; const blue = "#133760"; const black = "#10111e"; const white = "#fff"; const grayD = "#ddd"; const grayC = "#ccc"; const grayB = "#bbb"; const grayA = "#aaa"; const gray9 = "#999"; const gray8 = "#888"; const gmtPointerRed = "#aa0d0f"; const transparent = "grba(0,0,0,255)"; // 绘制表圈 function drawGmtBezel() { bezelCtx.save(); bezelCtx.clearRect(0, 0, 1800, 1800); // 设置中心点,此时225, 225变成了坐标的0,0 bezelCtx.translate(225, 225); bezelCtx.save(); // 阴影的x偏移 bezelCtx.shadowOffsetX = 50; // 阴影的y偏移 bezelCtx.shadowOffsetY = 50; // 阴影颜色 bezelCtx.shadowColor = "rgba(0, 0, 0, 0.5)"; // 阴影的模糊半径 bezelCtx.shadowBlur = 100; /** * 绘制陶瓷表圈 * @param {CanvasRenderingContext2D} bezelCtx * @param {number} begin * @param {number} end * @param {string} color * @returns **/ const drawCeramicCircle = (bezelCtx, begin, end, color) => { bezelCtx.beginPath(); bezelCtx.lineWidth = 26.5; bezelCtx.arc(0, 0, 113.25, begin, end); bezelCtx.strokeStyle = color; bezelCtx.stroke(); bezelCtx.closePath(); } // 画上表圈(蓝) drawCeramicCircle(bezelCtx, Math.PI, 2 * Math.PI, blue) // 画下表圈(红) drawCeramicCircle(bezelCtx, 0,Math.PI, gmtBezelRed) // 最外层金属旋转外圈 bezelCtx.beginPath(); bezelCtx.lineWidth = 6; bezelCtx.arc(0, 0, 129.5, 0, 2 * Math.PI); bezelCtx.strokeStyle = grayD; bezelCtx.stroke(); bezelCtx.closePath(); bezelCtx.save(); bezelCtx.rotate(-Math.PI / 2); for (let i = 1; i 13 && i 28 && i = 18 && i <= 28) { bezelCtx.fillStyle = gray8; } else { bezelCtx.fillStyle = grayA; } bezelCtx.strokeStyle = white; bezelCtx.fill(); bezelCtx.stroke(); bezelCtx.closePath(); bezelCtx.lineWidth = 1; if (i === 60) { // 绘制十二点方向外圈 bezelCtx.beginPath(); bezelCtx.lineWidth = 1; bezelCtx.moveTo(106, 0); bezelCtx.lineTo(120, 16); bezelCtx.lineTo(120, -16); bezelCtx.lineTo(107, 0); bezelCtx.fillStyle = white; bezelCtx.strokeStyle = white; bezelCtx.fill(); bezelCtx.stroke(); bezelCtx.closePath(); } if (i % 5 === 0 && i !== 60) { bezelCtx.save(); bezelCtx.rotate(Math.PI / 2); bezelCtx.beginPath(); bezelCtx.fillStyle = white; bezelCtx.font = "500 24px Saira"; bezelCtx.textBaseline = "bottom"; let width = bezelCtx.measureText((i * 4) / 10).width; if (width < 20) { bezelCtx.fillText((i * 4) / 10, -8, -99.5); } else { bezelCtx.fillText((i * 4) / 10, -12, -99.5); } bezelCtx.fill(); bezelCtx.stroke(); bezelCtx.closePath(); bezelCtx.restore(); } if (i % 5 === 3) { bezelCtx.beginPath(); bezelCtx.fillStyle = white; bezelCtx.strokeStyle = white; bezelCtx.arc(109, -4, 2.7, 0, 2 * Math.PI); bezelCtx.fill(); bezelCtx.stroke(); bezelCtx.closePath(); } } bezelCtx.restore(); bezelCtx.restore(); bezelCtx.rotate(0.5 * Math.PI); } // 绘制表盘 function drawDial() { dialCtx.save(); dialCtx.clearRect(0, 0, 1800, 1800); // 设置中心点,此时225, 225变成了坐标的0,0 dialCtx.translate(225, 225); // 画表盘外圈 dialCtx.beginPath(); // 画圆线使用arc(中心点X,中心点Y,半径,起始角度,结束角度) dialCtx.arc(0, 0, 100, 0, 2 * Math.PI); dialCtx.strokeStyle = grayC; dialCtx.stroke(); // 执行画线段的操作stroke dialCtx.closePath(); // 画表盘 dialCtx.beginPath(); // 画圆线使用arc(中心点X,中心点Y,半径,起始角度,结束角度) dialCtx.arc(0, 0, 53, 0, 2 * Math.PI); dialCtx.fillStyle = black; dialCtx.strokeStyle = black; dialCtx.lineWidth = 94; dialCtx.stroke(); // 执行画线段的操作stroke dialCtx.closePath(); dialCtx.drawImage(rolexLogo, -25, -56, 50, 27); dialCtx.fillStyle = white; dialCtx.font = "500 6px Nunito Sans"; dialCtx.textBaseline = "bottom"; dialCtx.fillText( "OYSTER PERPETUAL DATE", -dialCtx.measureText("OYSTER PERPETUAL DATE").width / 2, -21 ); dialCtx.font = "6px Nunito Sans"; dialCtx.fillText("GMT-MASTER", -28, 34); dialCtx.font = "6px Marmelad"; dialCtx.fillText("II", 25, 34.3, 4); dialCtx.font = "5px Trebuchet MS"; dialCtx.fillText("SUPERLATIVE CHRONOMETER", -32.5, 40, 65); dialCtx.fillText("OFFICIALLY CERTIFIED", -24, 46, 48); // 绘制刻度 dialCtx.save(); dialCtx.lineWidth = 1; dialCtx.shadowOffsetX = 5; dialCtx.shadowOffsetY = 5; dialCtx.shadowColor = "rgba(0, 0, 0, 0.4)"; dialCtx.shadowBlur = 10; dialCtx.rotate(-Math.PI / 2); for (let i = 1; i <= 60; i++) { dialCtx.rotate((2 * Math.PI) / 60); dialCtx.beginPath(); dialCtx.lineWidth = 1; dialCtx.strokeStyle = grayD; if (i % 5 === 0) { dialCtx.strokeStyle = white; dialCtx.lineWidth = 1.3; } if (i === 28 || i === 29 || i === 31 || i === 32) { dialCtx.moveTo(94, 0); dialCtx.lineTo(96, 0); } else { dialCtx.moveTo(94, 0); dialCtx.lineTo(98.5, 0); } if (i !== 30) dialCtx.stroke(); if (i === 29) { dialCtx.save(); dialCtx.rotate(-Math.PI / 2 - 0.05); dialCtx.textBaseline = "middle"; dialCtx.font = "4px Nunito Sans"; dialCtx.fillStyle = white; dialCtx.fillText( "M A D E", -dialCtx.measureText("MADE").width / 2, 98, 13 ); dialCtx.restore(); } if (i === 30) { dialCtx.save(); dialCtx.rotate(-Math.PI / 2); ctx.mozImageSmoothingEnabled = false; ctx.webkitImageSmoothingEnabled = false; ctx.msImageSmoothingEnabled = false; ctx.imageSmoothingEnabled = false; dialCtx.drawImage(logo, -3.5, 93, 7, 6); dialCtx.restore(); } if (i === 31) { dialCtx.save(); dialCtx.rotate(-Math.PI / 2 + 0.05); dialCtx.textBaseline = "middle"; dialCtx.font = "4px Nunito Sans"; dialCtx.fillStyle = white; dialCtx.fillText( "S W I S S", -dialCtx.measureText("SWISS").width / 2, 98, 13.5 ); dialCtx.restore(); } dialCtx.closePath(); if (i === 60) { dialCtx.beginPath(); dialCtx.moveTo(90, 12); dialCtx.lineTo(62, 0); dialCtx.lineTo(90, -12); dialCtx.lineTo(90, 12.5); dialCtx.lineWidth = 1.5; dialCtx.strokeStyle = gray9; dialCtx.fillStyle = white; dialCtx.fill(); dialCtx.stroke(); dialCtx.closePath(); } // 绘制刻度 if (i % 5 === 0 && i % 15 !== 0) { dialCtx.beginPath(); dialCtx.arc(82, 0, 8.5, 0, 2 * Math.PI); dialCtx.lineWidth = 1.5; dialCtx.strokeStyle = gray9; dialCtx.fillStyle = white; dialCtx.fill(); dialCtx.stroke(); dialCtx.closePath(); } // 绘制刻度 if (i % 15 === 0 && i !== 60 && i !== 15) { dialCtx.beginPath(); dialCtx.lineWidth = 1.5; dialCtx.strokeStyle = gray9; dialCtx.fillStyle = white; dialCtx.fillRect(60, -5, 30, 10); dialCtx.strokeRect(60, -5, 30, 10); dialCtx.fill(); dialCtx.stroke(); dialCtx.closePath(); } // 绘制日历窗 if (i === 15) { dialCtx.beginPath(); dialCtx.lineWidth = 2; dialCtx.strokeStyle = gray9; dialCtx.fillStyle = white; dialCtx.fillRect(57, -8, 25, 16); dialCtx.fill(); dialCtx.stroke(); dialCtx.closePath(); } } dialCtx.restore(); dialCtx.restore(); } function drawWatchPointer() { ctx.save(); ctx.clearRect(0, 0, 1800, 1800); // 设置中心点,此时225, 225变成了坐标的0,0 ctx.translate(225, 225); // 把状态保存起来 ctx.save(); // 获取当前时分秒 let time = new Date(); let day = time.getDate(); let hour = time.getHours() % 12; let min = time.getMinutes(); let second = time.getSeconds(); let millsecond = time.getMilliseconds(); // 渲染日历窗数字 ctx.fillStyle = "#000"; ctx.font = "bold 16px AppleGothic"; let width = ctx.measureText(day).width; ctx.fillText(day, width < 15 ? 63.5 : 58, 6); ctx.fill(); // 绘制圆轴 ctx.beginPath(); ctx.arc(0, 0, 7, 0, 2 * Math.PI); ctx.fillStyle = grayA; ctx.fill(); ctx.closePath(); // 时针 ctx.rotate(((2 * Math.PI) / 12) * hour +((2 * Math.PI) / 12) * (min / 60) -Math.PI / 2); ctx.beginPath(); ctx.lineWidth = 3; ctx.fillStyle = white; ctx.fillRect(0, -4, 40, 8); ctx.strokeStyle = grayA; ctx.strokeRect(0, -3, 40, 6); ctx.stroke(); ctx.closePath(); // 奔驰针头上三角 ctx.beginPath(); ctx.moveTo(48, -4.5); ctx.lineTo(57, 0); ctx.lineTo(48, 4.5); ctx.lineWidth = 2; ctx.strokeStyle = grayA; ctx.fillStyle = white; ctx.fill(); ctx.stroke(); ctx.closePath(); // 绘制奔驰针 ctx.beginPath(); ctx.arc(40, 0, 10, 0, 2 * Math.PI); ctx.fillStyle = white; ctx.lineWidth = 2; ctx.strokeStyle = grayA; ctx.fill(); ctx.stroke(); ctx.closePath(); ctx.beginPath(); ctx.moveTo(30, 0); ctx.lineTo(39, 0); ctx.lineTo(46.5, 7); ctx.lineTo(39, 0); ctx.lineTo(46.5, -7); ctx.lineWidth = 2; ctx.strokeStyle = grayA; ctx.stroke(); ctx.closePath(); // 恢复成上一次save的状态 ctx.restore(); ctx.save(); // GMT针 ctx.rotate(((2 * Math.PI) / 24) * time.getHours() + ((2 * Math.PI) / 24) * (min / 60) - Math.PI / 2); ctx.beginPath(); ctx.shadowOffsetX = 5; ctx.shadowOffsetY = 5; ctx.shadowColor = "rgba(0, 0, 0, 0.2)"; ctx.shadowBlur = 15; ctx.lineWidth = 2; ctx.fillStyle = white; ctx.strokeStyle = gmtPointerRed; ctx.moveTo(0, 0); ctx.lineTo(80, 0); ctx.stroke(); ctx.closePath(); ctx.beginPath(); ctx.strokeStyle = grayA; ctx.moveTo(79, -9); ctx.lineTo(95, 0); ctx.lineTo(80, 8); ctx.lineTo(80, -9); ctx.fill(); ctx.stroke(); ctx.closePath(); // 绘制圆轴 ctx.beginPath(); ctx.arc(0, 0, 6, 0, 2 * Math.PI); ctx.fillStyle = grayD; ctx.fill(); ctx.closePath(); ctx.beginPath(); ctx.arc(0, 0, 2.5, 0, 2 * Math.PI); ctx.fillStyle = grayA; ctx.fill(); ctx.closePath(); ctx.restore(); ctx.save(); // 分针 ctx.rotate(((2 * Math.PI) / 60) * min +((2 * Math.PI) / 60) * (second / 60) - Math.PI / 2); ctx.beginPath(); ctx.lineWidth = 2; ctx.fillStyle = white; ctx.fillRect(10, -4, 70, 8); ctx.strokeStyle = grayA; ctx.fillStyle = grayA; ctx.strokeRect(0, -4, 80, 8); ctx.moveTo(80.7, -5.1); ctx.lineTo(90, 0); ctx.lineTo(80.7, 5.1); ctx.fillRect(0, -4, 10, 8); ctx.fill(); ctx.closePath(); // 绘制圆轴 ctx.beginPath(); ctx.arc(0, 0, 6, 0, 2 * Math.PI); ctx.fillStyle = grayD; ctx.fill(); ctx.closePath(); ctx.beginPath(); ctx.arc(0, 0, 2.5, 0, 2 * Math.PI); ctx.fillStyle = grayA; ctx.fill(); ctx.closePath(); ctx.restore(); ctx.save(); // 秒针 ctx.rotate(((2 * Math.PI) / 60) * second +((2 * Math.PI) / 60) * (millsecond / 1000) - Math.PI / 2); ctx.beginPath(); ctx.shadowOffsetX = 5; ctx.shadowOffsetY = 5; ctx.shadowColor = "rgba(0, 0, 0, 0.2)"; ctx.shadowBlur = 15; ctx.moveTo(-30, 0); ctx.lineTo(90, 0); ctx.lineWidth = 2; ctx.strokeStyle = grayA; ctx.closePath(); ctx.stroke(); // 绘制秒针尾部 ctx.beginPath(); ctx.arc(-30, 0, 5, 0, 2 * Math.PI); ctx.fillStyle = white; ctx.fill(); ctx.closePath(); // 绘制秒针中间圆形 ctx.shadowOffsetX = 5; ctx.shadowOffsetY = 5; ctx.shadowColor = "rgba(0, 0, 0, 0.2)"; ctx.shadowBlur = 15; ctx.beginPath(); ctx.arc(55, 0, 5.5, 0, 2 * Math.PI); ctx.fillStyle = white; ctx.lineWidth = 2; ctx.strokeStyle = grayA; ctx.fill(); ctx.stroke(); ctx.closePath(); ctx.restore(); ctx.save(); ctx.restore(); ctx.restore(); }本文转载于:https://juejin.cn/post/7304533060514971657如果对您有所帮助,欢迎您点个关注,我会定时更新技术文档,大家一起讨论学习,一起进步。