前言
使用opencv对图像进行操作,要求:(1)定位银行票据的四条边,然后旋正。(2)根据版面分析,分割出小写金额区域。
 图像校正
图像校正
首先是对图像的校正
- 读取图片
- 对图片二值化
- 进行边缘检测
- 对边缘的进行霍夫曼变换
- 将变换结果从极坐标空间投影到笛卡尔坐标得到倾斜角
- 根据倾斜角对主体校正
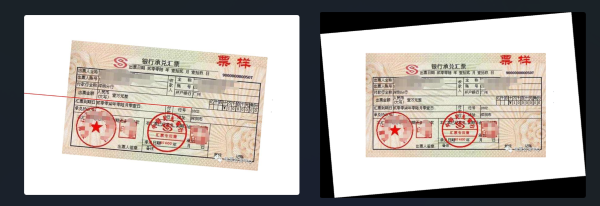
import osimport cv2import mathimport numpy as npfrom scipy import ndimagefilepath = './task1-misc/'filename = 'bank-bill.bmp'filename_correct = 'bank-bill-correct.png'def image_correction(input_path: str, output_path: str) -> bool: # 读取图像 img = cv2.imread(input_path) # 二值化 gray = cv2.cvtColor(img,cv2.COLOR_BGR2GRAY) # 边缘检测 edges = cv2.Canny(gray,50,150,apertureSize = 3) #霍夫变换 lines = cv2.HoughLines(edges,1,np.pi/180,0) for rho,theta in lines[0]: a = np.cos(theta) # 将极坐标转换为直角坐标 b = np.sin(theta) x0 = a*rho y0 = b*rho x1 = int(x0 + 1000*(-b)) # 保证端点够远能够覆盖整个图像 y1 = int(y0 + 1000 * a) x2 = int(x0 - 1000*(-b)) y2 = int(y0 - 1000 * a) if x1 == x2 or y1 == y2: continue t = float(y2-y1)/(x2-x1) # 得到角度后将角度范围调整至-45至45度之间 rotate_angle = math.degrees(math.atan(t)) if rotate_angle > 45: rotate_angle = -90 + rotate_angle elif rotate_angle < -45: rotate_angle = 90 + rotate_angle # 图像根据角度进行校正 rotate_img = ndimage.rotate(img, rotate_angle) # 在图中画出线 cv2.line(img, (x1, y1), (x2, y2), (0, 0, 255), 2) cv2.imwrite(filepath + 'marked-'+filename_correct, img) # 输出图像 cv2.imwrite(output_path, rotate_img) return True input_path = filepath + filenameoutput_path = filepath + filename_correctif image_correction(input_path, output_path): print("角度校正成功")图(左)中的红线斜率和偏置是经过霍夫变换并进行极坐标转换后得到,后续将根据这条线进行角度的校正,校正后的结果如图(右)所示。
 为了便于后续操作,我们选择将背景去掉,保存为.png图片。
filename_clear = 'bank-bill-clear.png'# 去除背景def remove_background(input_path: str, output_path: str) -> bool: # 读取图像 img = cv2.imread(input_path, cv2.IMREAD_UNCHANGED) # 检查是否已经具有 alpha 通道,如果没有则创建一个 if img.shape[2] == 3: alpha_channel = np.ones_like(img[:, :, 0], dtype=img.dtype) * 255 img = np.dstack((img, alpha_channel)) # 提取图像的 alpha 通道(透明度) alpha_channel = img[:, :, 3] # 将白色或黑色(背景)的像素设置为透明 alpha_channel[(img[:, :, :3] == [255, 255, 255]).all(axis=2)] = 0 alpha_channel[(img[:, :, :3] == [0, 0, 0]).all(axis=2)] = 0 # 保存为带有透明通道的 PNG 图像 cv2.imwrite(output_path, img) return Trueinput_path = filepath + filename_correct output_path = filepath + filename_clear if remove_background(input_path, output_path): print("去除背景成功")版面分析与分割金额区域
使用opencv对图像进行版面分析得到表格线的投影。
def detectTable(img, save_path): gray_img = cv2.cvtColor(img, cv2.COLOR_BGR2GRAY) thresh_img = cv2.adaptiveThreshold(~gray_img,255,cv2.ADAPTIVE_THRESH_MEAN_C,cv2.THRESH_BINARY,15,-2) h_img = thresh_img.copy() v_img = thresh_img.copy() scale = 20 h_size = int(h_img.shape[1]/scale) h_structure = cv2.getStructuringElement(cv2.MORPH_RECT,(h_size,1)) # 形态学因子 h_erode_img = cv2.erode(h_img,h_structure,1) h_dilate_img = cv2.dilate(h_erode_img,h_structure,1) # cv2.imshow("h_erode",h_dilate_img) v_size = int(v_img.shape[0] / scale) v_structure = cv2.getStructuringElement(cv2.MORPH_RECT, (1, v_size)) # 形态学因子 v_erode_img = cv2.erode(v_img, v_structure, 1) v_dilate_img = cv2.dilate(v_erode_img, v_structure, 1) mask_img = h_dilate_img+v_dilate_img joints_img = cv2.bitwise_and(h_dilate_img,v_dilate_img) joints_img = cv2.dilate(joints_img,None,iterations=3) cv2.imwrite(os.path.join(save_path, "joints.png"),joints_img) cv2.imwrite(os.path.join(save_path, "mask.png"), mask_img) return joints_img, mask_imgimg = cv2.imread(os.path.join(filepath, filename_clear))_, mask_img = detectTable(img, save_path=filepath)投影得到两张图,一张表示交叉点的投影,另一张表示表格线的投影,如下图所示,后续的边缘检测我们将用到右侧的图。

def find_bound(img): # 查找图像中的轮廓 contours, _ = cv2.findContours(img, cv2.RETR_CCOMP, cv2.CHAIN_APPROX_TC89_L1) # 遍历所有轮廓 site = [] for contour in contours: # 计算边界矩形 x, y, w, h = cv2.boundingRect(contour) if 20 < w < 35 and 20 <h < 35: site.append((x, y, w, h),) site.sort(key=lambda x: (x[0], x[1], x[2], x[3])) return sitesite = find_bound(mask_img)对mask.png,使用边缘检测,获取各个边缘的位置信息,根据所得的位置信息,在bank-bill-clear.png(对原图矫正角度并去除背景)中裁剪,并限制裁剪的图像块长宽在(20,35)的区间范围(实际尝试中并不能检测到金额区域的完整边缘,而是金额区域每个方形的边缘,(20,35)表示每个方形的长宽区间范围,如下图所示)。
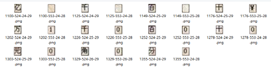
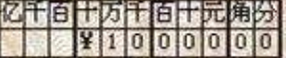
save_path = './task1-result'if os.path.exists(save_path) is False: os.makedirs(save_path)for i in site: x, y, w, h = i cv2.imwrite(os.path.join(save_path, f"{x}-{y}-{w}-{h}.png"), img[y:y+h, x:x+w])(x0, y0, w, h) = site[0]x, y = x0+(w+2)*11, y0+h*2cv2.imwrite(os.path.join(save_path, "res.png"), img[y0:y, x0:x])对裁剪的图像块的坐标进行排序,推测出完整金额的具体位置,并再次裁剪,得到最后结果
运行环境
numpy==1.26.2opencv_contrib_python==4.6.0.66opencv_python==4.6.0.66scipy==1.11.4参考文献
- Python对图像进行倾斜校正
- 深入理解OpenCV中的(row,col)和(x,y)
- 版面分析那些事